

I cant believe this time of year comes around so quickly! And nothing
is more satisfying than getting out the Christmas stash and start pawing
through it! One thing I did notice while poking around is the amount
of mixed media I have - and - not being used! Last year I had in my
mind that I would use a heap... and hardly touched it. This year, I'm
making it a focus.. so must!
I still love a black base, and still love that pop of colour,
but also need to use more stamps and dies that sit around - also neglected... yes, its time!
THE KIT

And, as in the past... there's been this love of 'doors' of mine..
So, stumbled across this stunning 7Gypsies paper.. and oh my!! Into the cart it went!!!

There's a 'kind-of' plan in my head, but as usual, it can go sideways or
lol - even backwards plus the odd 'let's start that again'!
--------------------------------------------------
THE COVERS

Weeeell, kind of......
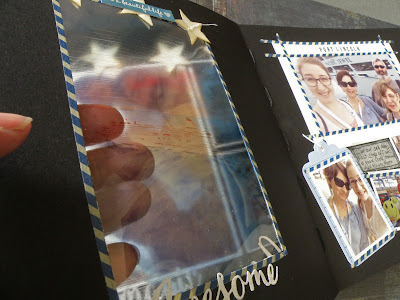
This year I'm using a Dylusions Square Black 8x8 Journal

So when I say 'kind of',
I'm doing the inside front page of the journal instead of the outside covers

Thats because of the included use of mixed media. I know paint and all sorts of things will inadvertently get stuck on the outside covers while I'm working on it no matter how careful I try to be, so thought it would be best to leave them till the end. I'm not envisaging that the outside covers will be over worked....and probably quite plain.
There is quite the underneath 'paint jobs' by accident on this inside cover to get to the
end product and at first I really thought I'd made a mess of it!

My original thought was definitely the doors!
Except... these were not the door I intended to use!
This is how I started out...
Except... these were not the door I intended to use!
This is how I started out...
Armed with red and green paint - AND my favourite 'door' paper by 7gypies, cut one of the shabby cream and green doors out thinking it was 'perfect'!

On with the red paint, nice and vibrant

Then thought...hmn, a bit of brick up the side of the door might be nice

Might just add a little green...and roll it on

Ugh.. and the thing turned to mud!

(Was having horrors by this time!)

On with the red paint, nice and vibrant

Then thought...hmn, a bit of brick up the side of the door might be nice

Might just add a little green...and roll it on

Ugh.. and the thing turned to mud!

(Was having horrors by this time!)
Back to the drawing board....best solution... paint it over black!
Put some very thin washi tape around it to keep the paint contained
And grabbed a stamp (Tim Holtz) and pressed it hard into the painted layers

BONUS! What I got was a very subtle print for a background...
YAY! Couldnt have turned out better nor by bigger accident!
The red and green paint even if just a smidgeon... showed through!!

LOL, THEN I changed my mind on the door!
It just didnt seem to suit any more so cut a little double one from the 7Gypies paper
And cut out the window panes too as I had this vision in my head.......

The vision was Santa passing by the windows in the door....
and a falala diecut in red sparkle crying out with the year added.

It just didnt seem to suit any more so cut a little double one from the 7Gypies paper
And cut out the window panes too as I had this vision in my head.......

The vision was Santa passing by the windows in the door....
and a falala diecut in red sparkle crying out with the year added.

Phew... not so bad afterall! LOL!
My heart did sink there for a little moment in the process!
Nothing a slap more paint couldnt fix and a little extra washi tape :)

----------------------------------------------------
THE PREPARATIONS

Just a slip of the knife underneath the stitching (got to be REALLY careful not to cut the thread!)


I dont tend to do a lot of preparation on each page before December 1st, though a good splash of paint on the black pages certainly is an idea :)

Totally love glitter paper... might stick to die cut numbers :)

And probably will add a diecut word or two :)

Ooooh and lastly, got my hands on these fabulous and somewhat whimsical stamps.

-------------------------------------------
DAY 1


Now all stuck down

DAY 2
----------------------------------------------------------
DAY 3


Had a little help with adding a 'Cruise Journaling Kit' which was for sale onboard.
Sure was great to add this to my miniscule stash!


The other side of the double page spread for the 3rd December...


-----------------------------------------------------


I ended up using the experimental stamped images... it doesnt matter to me they arent perfect


I managed to pick up the extra thin washi, and its fabulous for definition and adding interest to a page


DAY 6


It should look great when the next pages are complete and we can see through to them


Just as the line of photos add to Paige's night on the side :)


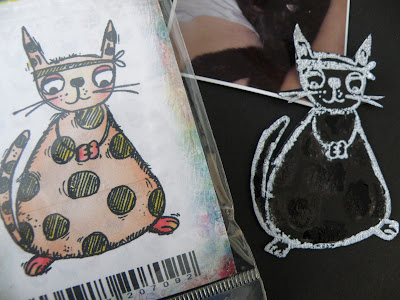
I loved this stamp the minute I saw it, but..... my cat is black so a little adjustment had to be made.


Diecut trees and front door

and some diecut branches (adding in some lovely epoxy hanging baubles)

And a few finger swipes back and forwards with some Inka Gold - 'Jade'

Just got to remember to get the dies out more often and use them!

DAY 18

The easy to pack 'Lustre Rub-ons' are great when on the road as it can easy add colour to the page


The stuck-in card has been layered and stitched around the edges with my sewing machine.

Opening the card up.......


DAY 20

DAY 21


DAY 22

DAY 23


DAY 24

First was a peek-through star... by cutting a hole into the page.


Next is another stamp I just love - because its such a favourite verse.

And another learning experience....


Nothing that couldnt be fixed by some more Smooch colouring

My heart did sink there for a little moment in the process!
Nothing a slap more paint couldnt fix and a little extra washi tape :)

----------------------------------------------------
THE PREPARATIONS
There's just a couple of alterations needed to make this Dylusions
Journal work really well with the added December photos and
embellishments.
There is 94 pages if counting backs and fronts of each one - so too many
for a December Daily. Removing a middle pages from each signature
brought down that count, missed a couple but took out ten. And now it
leaves space for the filling of photos/paint/embellies!

Just a slip of the knife underneath the stitching (got to be REALLY careful not to cut the thread!)

And a little tug, it comes away well

I dont tend to do a lot of preparation on each page before December 1st, though a good splash of paint on the black pages certainly is an idea :)

Totally love glitter paper... might stick to die cut numbers :)

And probably will add a diecut word or two :)

Ooooh and lastly, got my hands on these fabulous and somewhat whimsical stamps.
Just have to have a good think about how/where to use them!!

-------------------------------------------
DAY 1
So glad I did have my first page sorted with a bit of a paint.

I absolutely adore the (very old but you can still get them) Fancy Pants Glitter Cuts
(If I see them, I buy them!)

Thought that with my glitter die cut 'believe' that these little vellum stars would be a great touch,
just got to find the right place for them then stick them down

Journalling in white pen (jelly roll 08 is my favourite!)
around the edges of the double page

Now all stuck down

It's a start!
------------------------------------------------------------
DAY 2
this time I'm trying some
I'm travelling at the moment, so picked up this metalic rubon palette which was easy to pack with my LDD art journal and bits and pieces.


metalic rubons on the black cardstock

I'm travelling at the moment, so picked up this metalic rubon palette which was easy to pack with my LDD art journal and bits and pieces.
Its called 'Luster Rubons' which highlights pretty much anything.

Photographing black is not easy - so apologies.
I've placed the two photos down and judged pretty much where the outline is
and just used my finger to rub the bronze colour on the background.

Diecutting some bits before I left on holiday was a great idea...

So put together a couple of clusters of embellishments on this page
including making the little bauble,
its just free hand drawn and cut out with a little black bow
And I just LOVE Cardinal birds....

And added a couple of red sequins for berries on the holly vine

Added some little star sequins and some freehand squiggly lines for my
journalling using my favourite white pen (jellyroll 08)
The number is diecut in white glitter paper.
----------------------------------------------------------
DAY 3
We been on a cruise therefore the amount I was able to pack to scrap with while away
and keep with my posts here was pretty minimal and the pages fairly basic.
But that's okay because travelling and scrapping can be limited, but its the best
of both worlds :)
and keep with my posts here was pretty minimal and the pages fairly basic.
But that's okay because travelling and scrapping can be limited, but its the best
of both worlds :)

And the good ole cruise photos that seemed to be around every corner...
I knew that would help also with getting my days done with already printed photos to purchase
I knew that would help also with getting my days done with already printed photos to purchase

Had a little help with adding a 'Cruise Journaling Kit' which was for sale onboard.
Sure was great to add this to my miniscule stash!


On one of our hop off tours, I managed to pick up this little beauty...
varigated ric rac trim on a little cotton reel.... very handy too!

The other side of the double page spread for the 3rd December...

Some of the cards in the Kit had fabulous glitter embossing on them.
So lovely!

Now that I'm back home, I'm really looking forward to getting back into
mixed media on my pages and caught up!
-----------------------------------------------------
DAY 4
For this double page, there is the use of transparency printing and Inka Gold with stamping

A little watercolour ship printed out on inkjet transparency.
It has a rough side and a smooth side.... its the rough side thats printed on and that sets the ink

Measured out, a rectangle is cut out of the art jounal page

Just a check to see the fit... glittery black washi tape will hold it together

I absolutely LOVE Inka Gold (not to be confused by the colour gold)
So I thought I'd do a little experiment on the cut out piece of black
cardstock as I wanted to do an extention of the watercolour onto the
black page....
Let's see how this goes....
The colours 'Platinum' and 'Aquamarine' have been used.
I even tried stamping on it using Memento black ink....
Wasnt overly successful (would have been better in my stamp press!)
But thats okay :)

So here's how the Inka Gold turned out.
Gosh is so vibrant against the black ...

I ended up using the experimental stamped images... it doesnt matter to me they arent perfect

--------------------------------
DAY 5
This is the back of the reverse side of the transparency, and on the other page, a clustering of photos


I managed to pick up the extra thin washi, and its fabulous for definition and adding interest to a page

Adding in some more Inka Gold Platinum for some journaling spots....

And I found my Jelly Roll black pen glided over it and stayed put, not smudgy.

A bit of a cluttery page, I really wanted to add all these pics and its worked in a fun way.
Slipping a little tag under one of the photos helps break it up a little and highlights the pic in a way.

---------------------------------------------
DAY 6
This time I've used some Shimmerz Dazzlerz Dimensional Paste and a star edge punch

The Dazzlerz is more like a 'mousse' than a paint and its certainly not
as vibrant as the Inka Gold metalic rub, however it had a more subtle
look to it.
There were two main photos I wanted to highlight for this double spread.
It was Paige's 21st birthday, and one photo is for what we did in the day
The other was what happened for her special dinner that night.
The 'Red-iculous' colour was chosen because the leadlighting in the day
photo was pink along with other pink hues and I knew the paste would go
on more pink than red (other than its colour name suggests) against the
black. It was a great match.

The night photo had more yellow hues, so chose the 'Lemon Drop' even though the rolled on colour
looked more pale lemony-green, it still worked.

Along the edge of the page, the little stars worked a treat (also leaving punched out stars to be used on other embellishing :)


It should look great when the next pages are complete and we can see through to them

Some fun little photos line the side over the pink....

Just as the line of photos add to Paige's night on the side :)

-------------------------------------------------
DAY 7
A bit of a play with Inka Gold (Violet and Mint Green) and some old Prima masks
that had been buried in my stash. They suit the 'Flapper' era of the party
It kinda turned out a bit messier looking than I hoped, but still, the
Inka Gold is fabulous against black backgrounds. The stars are
actually silver, but I think the the reflection in the camera shot
changed the colour a bit.

The masks each had an oval and a square solid part to them (like the sign part)
but I snipped them off so the photos could 'hang' there instead

It was actually quite fun dabbing in the colour

And, added in some flowery diecuts to boost the purple on the page a bit
(I dont actually have a lot of purple!)

---------------------------------------
DAY 8
This page is a bit of a fun one...both for Paige and her antics, and for
me finding just the right stamps and expression to use!

Remember all the pages I took out of this art journal (both because
there was too many, and I wanted to take out some bulk so I can add in
some lol!)
Weeeeell, it has come in very handy to stamp on and cut out, so matching
up the cardstock...it just disappears into the background. I've used
Viva 3D Stamp Paint Its more like a paste and it dries hard, almost
like chalk. I love it! I've also begun to miss not scrapping
Christmas. Everything this December so far has been about everything
else but! So managed to add quite a bit of it here!

This washi tape has some great expressions on it, so cut out the ones that worked.

Lumiere paint would have to be a favourite (I've tried others and more
lately Dylusions.. but I still come back to this or older brands) Santa
needs a little colour!

Ages ago, I bought a heap of colours in 'Smooch' (it looks like fingernail polish - but isnt)
And really have begun using it heaps in this album. Here I've used the 'Shabby Pink'
for Santa's nose!

And using my Jelly Roll 08 White pen, I've drawn in little squirly circles
Santa's beard, and cuffs - quite a bit of fun!

I think Paige is going to laugh when she sees this page!

-----------------------------------------------
DAY 9
This was quite a simple page to do...
It was the travelling home day... so some BoBunny Emoji Dies expressed how we were feeling about each part of the day...

These are fabulous... there are all kinds of funny expressons in the packet!
Something I think will but used quite a bit!

------------------------------------
DAY 10
Again, I started to feel like I was steering away from Christmas
scrapping.. and kept looking at my lovely Christmas stash just itching
to be used...

.......So reached a compromise for this page... and dug out some very old Basic
Grey Wassail Stickers! It works... it feel old-worldly, enough for a
65th wedding anniversay!

------------------------------
DAY 11
At last some Christmas scrapping!
I always love to add in my pets. Each year I wonder if our dear cat will still be with us.
And as I look back on previous December Dailys, I see his portraits and so glad of them.

Because this was a fairly plain page, these little bright red glittery stars helped
brighten things up

-----------------------------------
DAYS 12 &13
A double page with some mixed media and masking...
Another pet appearing in her 7th December Daily!
She loves posing for that perfect Christmas pic (unlike the cat!)

Some more of the Inka Gold - Yellowgreen and Lavared
with a Tim Holtz mask

It was really easy to make the imprints and the colour vibrant against the black


-------------------------------------------
DAY 14
Not the best pic in the world, but its one of those photos that dont
happen very often where the camera is grabbed and 'click'. But its
lovely to me as I suspect this may be the last December Daily my
precious cat will be with us. This is just a simple little page.

I loved this stamp the minute I saw it, but..... my cat is black so a little adjustment had to be made.

First, stamp it with the Viva 3D Paint onto black card, and then colour in the dots
with my Smooch 'Tuxedo' paint.... and it worked a treat

It's still drying here. (Smooch does take a little time to dry)

------------------------------------------
DAY 15
This was such a fun page to do..... especially with some PaperArtsy stamps

Smooch worked so well.. it is vibrant against the black too...
Applegreen, Kiwi, Illuminate, Firecracker and Siren

Did a bit of shading to give it some dimension

------------------------------------
DAY 16
And our little Sparrow, this is her 4th December Daily! But she's hard to photograph as she's so fast.
She landed on my computer, I grabbed the camera, but I didnt like what
was on my screen at the time to put in my album... so........

........ so I cut it out... and thought it would be a bit of fun to put something else there

Some more stamps, and 3D stamp paint...

And some old Making Memories Paint to colour it all in

Worked!
DAY 17
Pretty much, it was about getting out the dies....

Diecut trees and front door

and some diecut branches (adding in some lovely epoxy hanging baubles)

And a few finger swipes back and forwards with some Inka Gold - 'Jade'
for some definition under the tree and the title too.

Just got to remember to get the dies out more often and use them!

DAY 18
And again I'm travelling and scrapping away with a little kit.
You know when you are finished decorating and everything is
'just so'...and a photo is taken.... This year we decided to make the
main focus in our sitting room and not the main loungeroom and it was
lovely.

The easy to pack 'Lustre Rub-ons' are great when on the road as it can easy add colour to the page
Diecut in glitter paper (though hard to tell from these pics)

And tried to create a kind of mantel for the pic too....

DAY 19
This was such a special day for Paige's graduating from university that
there were many photos, so adding a 'card' like structure to the page
helped add in quite a few extras.
(A little side-note: I did make the little graduation hat jar Paige is
holding... its filled with mostly $5 notes. The hat took no time to make
out of black cardboard and a gold tassel... she was thrilled to
bits!)

This torn out page look stamp spelled 'study' to me lol, so went with it down the side
(its actually a 11 1/2inch stamp) using some 'Stampendous Shabby White Embossing Enamel', though havent heat set it here yet.

The stuck-in card has been layered and stitched around the edges with my sewing machine.
I've used a stencil with some texture paste and a cute little 'graduation' die with glitter paper

Opening the card up.......

...... there is quite a bit of extra space for photos - got to love that!
And a bright bit of washi tape!


DAY 20
This was a simple block design. I print my photos at home in any
measurements and like to have a white border around them especially
against the black background. These groups of photos just clicked into
place including a journaling block. Just add stickers (grin)

DAY 21
Again it was a day of wanting to add four photos so went a block-ish design
to compliment the opposing page.
This time the glitter numbers are in red - the white kind of disappeared into the photos.

I too, like Tracey am trying to use up my rubons. At last the white
ones will be rubbed on to the black background and look good.... my
problem.... rubons are not my friend!
I struggle - you can see where I've rubbed and rubbed to get the jolly things to stick!

DAY 22
More rubons used!

DAY 23
I've been excited to use a gorgeous Penny Black stamp for this page...
(I'm no great stamper or embosser - but love to have a go and even experiment)

Hmmmm, I'm not sure about this... Stampendous Shabby Green... weeeeell....
I can honestly say.. there isnt much if any 'green' in it! It didnt
look a whole lot different to my 'Shabby White'! Never mind
because........

........out with the smooch colours
(sundance, siren, moccha)
I've tried a million ways to photograph this close up so you can see the
beautiful sheen Smooch produce, but to no avail... my camera just wont
pick it up. It doesnt do it justice.


DAY 24
A double page for the 24th...
probably more in anticipation for Christmas Day!
I think there is a couple of key fun parts of creating these pages.....
Love to use the Lustre Rubs for shading....
Love to use the Lustre Rubs for shading....

First was a peek-through star... by cutting a hole into the page.
Even though there is nothing on page underneath (for the 25th yet)
I'll plan so something makes sense peeps through

This is on the reverse side - also yet to be created
I tried to centre the photo from the 24th to show something of faces peeking through

Next is another stamp I just love - because its such a favourite verse.
And how much do I love my stamp press!!
Weeell it makes a not so great stamper into a much better one!

And another learning experience....
How gorgeous are these Graphic 45 Nutcracker Sweet stamps!
I thought why not use the VersaCraft ink - well known for stamping of fabric and the like...
only because I got such a white imprint! Looks great.... but took a little while to dry.

but then they dried a dull grey....

Nothing that couldnt be fixed by some more Smooch colouring
and my white Jellyroll 08 pen to outline

--------------------------------------
Christmas day is always hugely busy for us....
probably more than most and we do this same routine year after year...
We start with the morning at our house - it needs a page (change that to double page!)
By lunch we travel (not far) to my husband's family farm (another double page)
And by the evening we've travelled 3 1/2hrs to the other end of the state to be with my family
(yes, another double page)
In my defence though - my pages are only 8x8 and in contrast to my other
December Dailys - thats small!
LOL, so with that said... I got to scrap up a storm the last couple of days...
DAY 25
The Anticipation....

Here's the other side of the star on the reverse of Day 24,
By ruling some outline around the stars edges, it gave it definition.
The 'dec 25' was a diecut that had come in a pack. It was the same width of the
star so went with a 'column' look to this side

Just love the Victorian Santa Claus and flora

Another peek through page.....

I've used some more doors from this 7Gypies paper
Gosh its lovely!!

And cut out two doors (from two pieces of the 7Gypsies paper and
the 'panes' of the window in the doors

Apologies for the poor photo (took this as light was fading..) but you
can see the cut out piece of the page (to fit a 7x5photo that will be
fixed to the next page), and the doors are attached by long strips (of
the cut out piece) and folded like long hinges and glued so the doors
can 'swing' open.

The 'brickwork' and the stars for 'doorknobs' are also part of the 7Gypsies 'Architexture' sticker range.
I wanted the it to look like we were seeing in from the outside of the 'house'

And here's how it looks with the doors swung open to see through to the next page.

THE MORNING
Add a star banner, some diecut branches, more white rubons and stickers
and the page came along quite quickly. Putting glitter washi tape
around the edge of the doors covered the somewhat rough cutting

Peeking all the way though....

And peeking through from the 24th through the other way :)

The unwrapping of presents...
I thought all the colourful pieces of pie graph kind of looked like
wrapping paper.. and it did go everywhere... love that moment on
Christmas morning!

The pie pieces where cut from little bits of colourful paper I had in a little dish.. does come in handy!


Dusted off my 'IZINKs' in Tomato and Cactus

Put a dob of it here and there, then with a straw.... blow!
What a great effect and so vibrant!

What a great effect and so vibrant!


THE AFTERNOON
This double page felt completely different to the page before..

So got out the big shot and made some diecuts that really suited in greys and whites to work with the colours in the photos.
(and who doesnt love sequins for a pop of colour too!!!)

Another 'card structure' has been add under the 'ho ho ho' to hold more photos
The little row of christmas trees are a lino cut print I made and then printed
out in various colours ages ago.

Opening the card....

...really does help with those photos not wanting to be left out.

THE EVENING
The 25th is the cresendo in my December Daily... so if there are lots of photos,
I try find a way to include them.

I didnt want to do another card structure so baubles work!!
Add in a few diecut pine branches...

Phew... thats the 25th done!
---------------------------------------DAYS 26 - 28
These are the last days for my December Daily. Maybe its weird to stop
midway between Christmas Day and the 31st of December... but there are
no rules (very big grin)
Its just that our time away for Christmas happened to finish on the 28th
plus we had our eldest daughter home until then and so the rest can go
into my annual 12x12 Project Life Album.
(lol, afterall, the latter has been cast aside completely while doing my Dec Daily!)
And our Summer really began in earnest now...
Used some lovely Heidi Swapp glitter wide washi tape and the decorative one is Basic Grey (Oliver?) with some star banners.
Finishing up on some pretty straight forward pages.

More washi tape here too... bricks in red and brown... cute!

Thats the last pages!!
YAY ALL DONE!!

Stunning! And I love the doors.
ReplyDeleteSuper !!1 Love how it looks!
ReplyDeleteLOVING this soooooooo much!! And glad you were able to 'fix' it!!!! That door and Santa are AMAZING!!!!!!!!!!
ReplyDeleteHow awesome that turned out :) Yep no mistakes in scrapping at all :)
ReplyDeleteI don't do December Daily...too much pressure...but this is a cool idea; the DT! So I will follow along just for general inspiration! Congrats to those that made the team!
ReplyDeleteOh and I just read the entire post and process... and for being an unplanned mistake, it came out phenomenal! Wish my mistakes ended up like that!
ReplyDeleteSo pretty! I love the idea of making something like this.
ReplyDeleteBlessings~
I had a little chuckle at your "was having horrors by this time". lol Had these same horrors myself on many occassions lol. BUT all is good and your cover is A M A Z I N G as always.
ReplyDeleteYour album cover looks fabulous Mandy..I love the door too!
ReplyDeleteMandy - this is amazing! I love the look of the doors and the Santa. I think your "mistake" turned out beautifully!
ReplyDelete