


I'm making my cover this time because I wanted to try something different, to see if I COULD as well as probably going with a different shape. Well, the latter didn't end up happening, but I loved creating the album from scratch.
Firstly I purchased some chipboard (about $1.20 per 12x12 sheet - really thick cardboard that is layers and layers of paper) around 4mm thick.

I
measured out the cover size 22cms x 23.5cms and cut out two. The spine
needed to be wide enough to be bigger than the rings used inside, so cut
one piece that was 5cms wide and 23.5cms long.
I used a metal ruler and a scalpel as it was going to take a lot of cuts to get through the thick chipboard.
I laid out my pieces and applied double sided tape to the tops where the paper was going to attach on the inside and the outside.

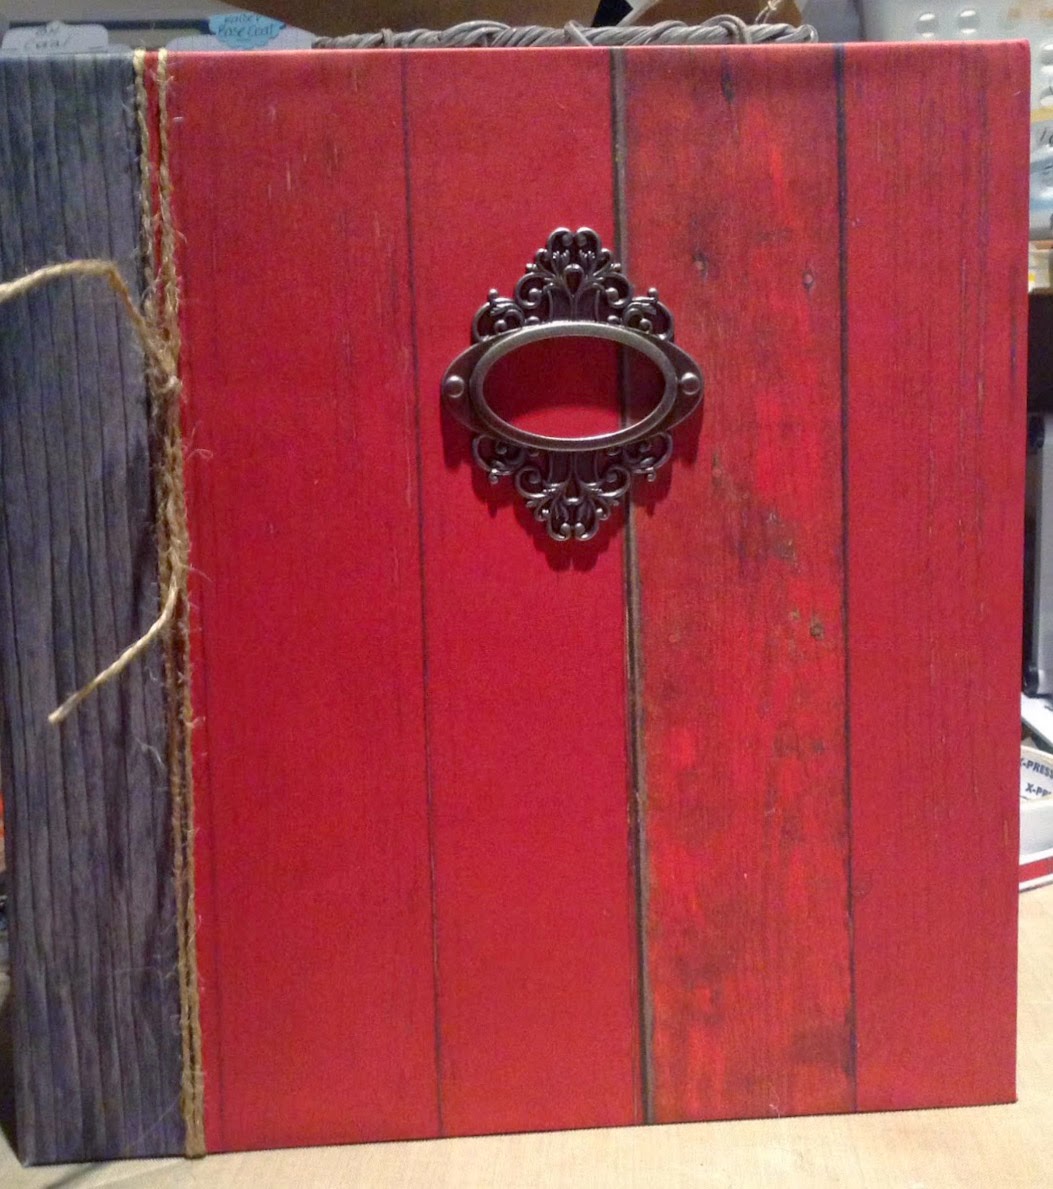
My spine I wanted covered in the Kaisercraft Basecoat Christmas - Santa paper which is the timber with a few little pinecones in the corner.
I placed all three pieces of chipboard on top of the 17cm wide paper. I put about 1/2cm in between the chipboard pieces to allow for the spine to bend and have some flexibility and not tear when opened.
I placed all three pieces of chipboard on top of the 17cm wide paper. I put about 1/2cm in between the chipboard pieces to allow for the spine to bend and have some flexibility and not tear when opened.

The next step is very important. To allow for the flexibility and to make sure the paper doesn't tear and the album falls apart, I placed packing tape along the 1/2cm spaces of the chipboard to cover the gap and attach to the chipboard pieces, making sure I pushed the tape down to attach to the paper in the valley of the chipboard.

Fold down the top edges and adhere to the double sided tape both top and bottom.

And this is what it should look like on the outside.......................

Next was the outside cover. I had a hard time choosing between the red worn timber or the green worn timber paper but chose the red - Kaisercraft Basecoat Christmas - Flora
Allowing 1 - 1.5" past the edges, I adhered the paper to the outside but flush up against the edge of the brown timber paper on the spine.

Flip it over and angle cut the corners.......

Adhere down..................

Cover the inside cover with whatever paper you choose, adhering the paper right over those valley folds in the centre (not just the strip of paper I mistakenly did and realised my mistake afterwards.) I chose to use the timber paper on the inside also.

This piece was taken out of an old binder that I had here. The rings were perfect but the binder was a bit worse for wear.
I placed this in the middle on the left of the back cover and draw pencil lines where the holes needed to be cut out.
I used a hammering hole maker to punch out the holes. Lathered the underneath with a very strong glue and tied thick twine through the holes and around through the binder rings a few times to help secure while drying.
When it was dry, I decided I liked the twine on it so left it there. You could use brads in the holes at the end of the rings for security and decoration.

And my finished product after decorating the front of it with a metal label holder which is for the year, 2014.
Its very plain but I wanted it to be a feature of the wood papers.
My intention originally was for it to look like a book and I'm happy with the outcome.
Its very plain but I wanted it to be a feature of the wood papers.
My intention originally was for it to look like a book and I'm happy with the outcome.
I can't wait to start inside the book. See you soon!
------------------------------------------------------------------------------------------
Ooooooooo!!! How exciting!!! I've started my December Daily. I have been waiting for this moment for a few months!!
This is my first page. Stating who and when.

Our first day was very exciting! Some photos of tinsel our elf and some family photos with our visitor.
I kept these rather plain as I wanted the photos to stand out a bit.
I kept these rather plain as I wanted the photos to stand out a bit.

Trimming the tree was done on the 2nd December and I took some photos of some of the decorations that we were so excited about finally being able to put out.
The decorative edges that I made to cover the old holes to make the new holes are all different colours of red, gold and Kraft cardstock.
Some pre made pocket cards and cut up Christmas papers served as the background piece for the photos.
Sequins and washi tape were added for some colour.
The decorative edges that I made to cover the old holes to make the new holes are all different colours of red, gold and Kraft cardstock.
Some pre made pocket cards and cut up Christmas papers served as the background piece for the photos.
Sequins and washi tape were added for some colour.

And this was the end of day 2. Filling in the pockets with some photos of Christmas decorations and a Christmas invitation.

I am very excited to see what you all come up with, from all this inspiration from all of us here.
-------------------------------------------------------------------------------------------------------
Here are my days 3-6 with little added extras.
On this page, Day 3, I cut out 'Believe in the magic of Christmas' and placed on top of gold glitter paper to add some sparkle to the card. I also had a pre made 'to do' list and covered the little 'tick' boxes with gold foil and glitter stars.

Day 4 is a little collage of all the things I've been creating and Christmas themed plates and bottles for the kids.
Day 5 is of Tinsel's trip into work with me using a sheet of Kraft card with gold foil spots from the Teresa Collins collection. I layered up embellishments in the bottom right hand corner and gold glitter embossed the number 5.
I am just loving GOLD!!!
I am just loving GOLD!!!

I am yet to finish the left page. I decided to jot down our favourite Christmas songs this year on little luggage tags, still to be filled in.
Day 6 is kept very simple having a few photos of the day.
I am loving writing on those little luggage tags.
Day 6 is kept very simple having a few photos of the day.
I am loving writing on those little luggage tags.

And some left over photos of Day 6, with lots of layering with tags, washi tape and embellishments and making a feature of the one on the right and putting it on a die cut page on it's own.

---------------------------------------------------------------------------------------------------
Here is
Day 7 & 8.

On the left - Day 7
I used a little patterned paper bag to adhere the photo to and then popped a journaling tag inside.
Lots of layers and washi tape.
I used a little patterned paper bag to adhere the photo to and then popped a journaling tag inside.
Lots of layers and washi tape.
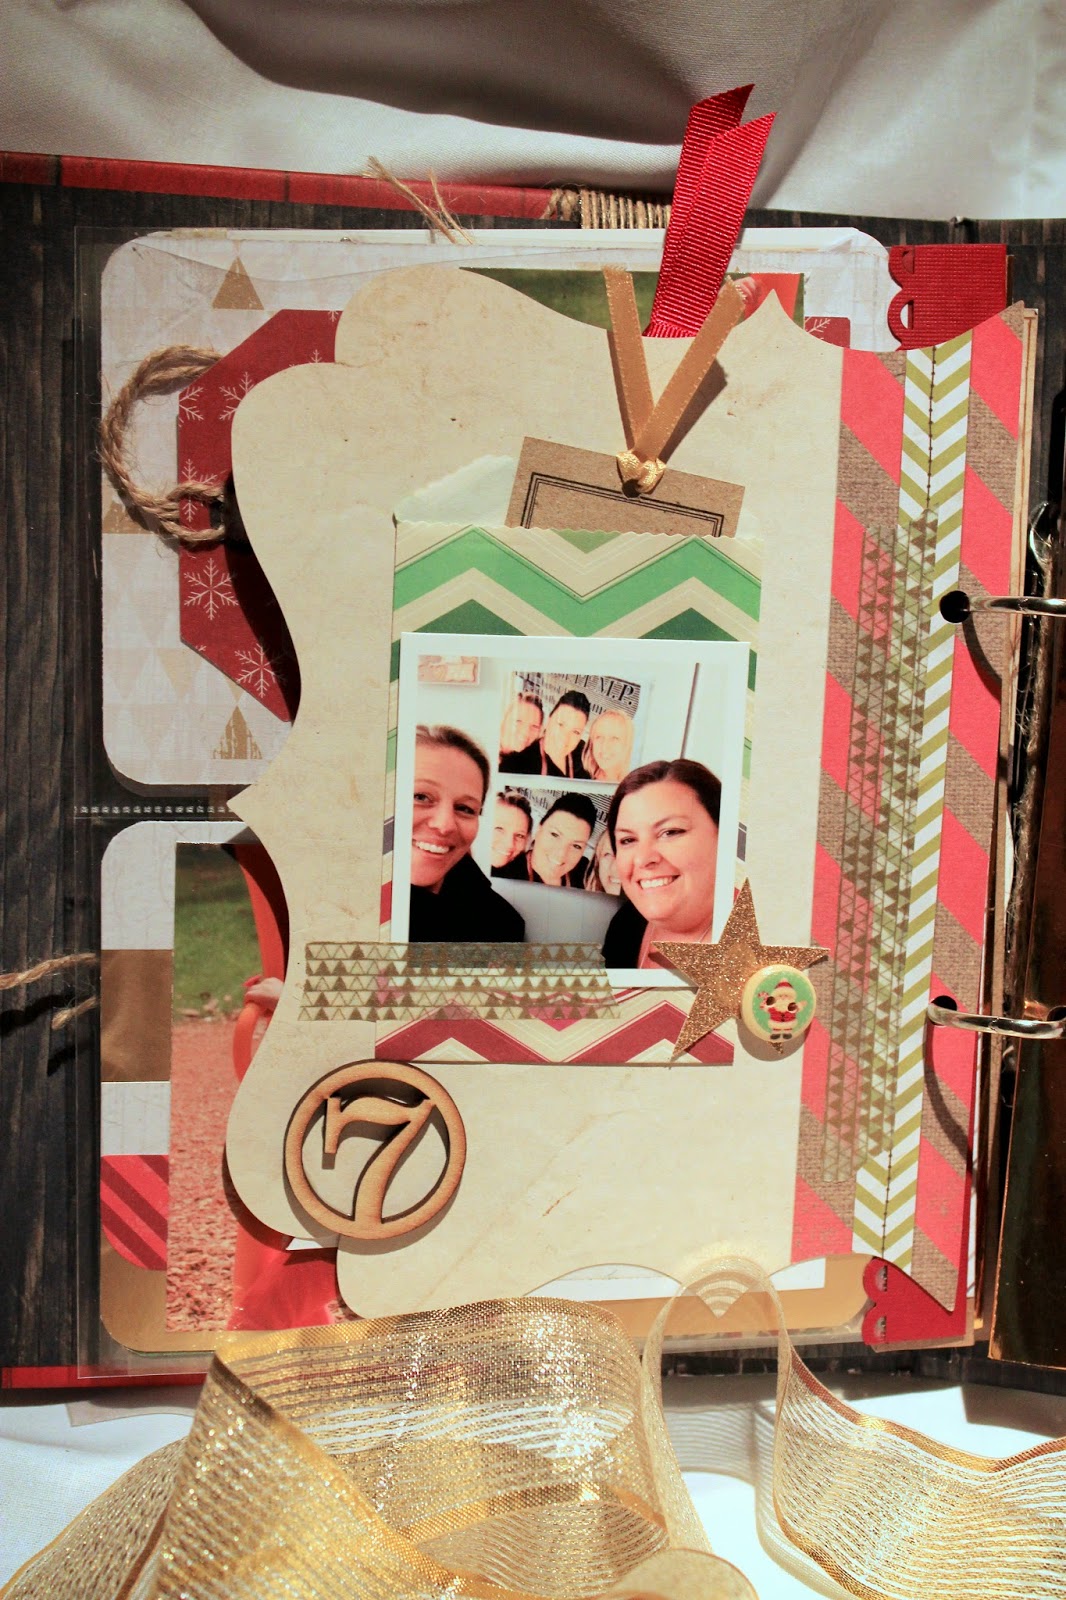
The 8th, on the right
I used a photo with no journaling. The picture really says it all.
I find that with some photos, there doesnt need to be any journaling.
I used a photo with no journaling. The picture really says it all.
I find that with some photos, there doesnt need to be any journaling.

Days 9 & 10
Were busy days also, so didn't get many photos. In place, I took photos of the catalogues that my daughter had items circled and used those to show what interests she has at this age.
Were busy days also, so didn't get many photos. In place, I took photos of the catalogues that my daughter had items circled and used those to show what interests she has at this age.


Day 10
Is a collaged photo of the last orders done for Christmas.
I had a few photos I wanted to record in my December Daily, so I made a little collage and printed it as a 6x4" print and embellished it on a 6x8 paper and inside a 6x8 pocket page.
Well, well, well!! Isn't December just flying by!?
Here are my pages for
Days 11, 12 & 13.
Days 11, 12 & 13.

Day 11
Tinsel hadn't moved much for 2 days, but had been sneaking into work with me.
Tinsel hadn't moved much for 2 days, but had been sneaking into work with me.

Day 12 & 13
I didn't have any photos for 13, so I wrote on a tag and stuck it on a 6x4 card.
On the tag I wrote what I love about Christmas.
On the tag I wrote what I love about Christmas.

Day 14
Our Family Christmas

Photos of the little chocolates I wrapped with scrapbooking paper to co ordinate with the table decorations.

A surprise visit from my Nan from Queensland meant that I could get all the great photos of her with my mum preparing all the food.
The other photo is of the festive spirit my parents dogs get into for Christmas.
The other photo is of the festive spirit my parents dogs get into for Christmas.


I have to take photos of the table, the decorations and the food.
I made the trifle so I had to document that.
I made the trifle so I had to document that.

The gorgeous Christmas Tree of my parents, out on the back deck with all the presents.
And then gift giving time. I take a lot of photos on Christmas. Especially the gift giving part.
And then gift giving time. I take a lot of photos on Christmas. Especially the gift giving part.

As I've said, I DO take A LOT of photos at events and celebrations and I love to use all of them to document with. I struggle trying to cull down to a fair size.
So in saying that, this was our Christmas, which was a big day and event. Especially to have my Nan being able to join us. I took A LOT of photos.
So in saying that, this was our Christmas, which was a big day and event. Especially to have my Nan being able to join us. I took A LOT of photos.
So I have split this day, (day 14) into 2 lots of posts.
The rest of the day will feature in my next post.
The rest of the day will feature in my next post.
-----------------------------------------------------------------------------------------------------------------
Well I'm back to show you the rest of my Family Christmas (Day14)

I love the candid shots of those special moments and had to capture these.
I've used layers on these to add some depth. I just love those Kraft tags and slipped one under the journaling card at the bottom.
I've used layers on these to add some depth. I just love those Kraft tags and slipped one under the journaling card at the bottom.

This was a Bo Bunny pre made die cut page that I used for displaying these photos with added journal stickers and washi tape.


The back of the pre cut page.

and the opposite page kept pretty simple because of the photo of the decorations on the tree.

I love taking photos of the present unwrapping because I love the expressions that it captures.

Again a die cut tag to mount the photo on with some washi tape.

Some glitter tape to glitz up the page.


Some more glitter tape and layers using a little Kraft tag with alpha stickers on them spelling out Mum & Dad


Photos of the excitement and enjoyment of testing out the new gifts and a random photo my daughter took when I let her use the camera. And I absolutely love this photo of my Nan.

A Die cut tag from Bo Bunny that I journalled on about how hard it is to get a family photo and how much they whine and complain about having to do it. But I bet they will treasure it as much as I do when the day is done and gone.
The F Family card was just perfect with this photo.
The F Family card was just perfect with this photo.

----------------------------------------------------------------------------------------------------------------------
Here are my pages from Day 15 to half of Day 21..........................


I had no photos for this day so journalled why and used a die cut to decorate the page. Even though I don't have photos for some days, as I get too busy and distracted, I still want to document that day in my December Daily. Sometimes I may use a quote card or another type of die cut, but I still include the number of the day on the page.........................


Christmas Morning and I've documented the excitement of Santa's visit, the unwrapping and the expressions on everyone's faces. I started the page off with a Santa tag and the number 25 sticker on top of glitter tape to 'introduce' the day..........................


Finished!

---------------------------------------------------------------------------------------------------------------
On the left is Day 15. Not much happened that day, only that I had taken a photo of my daughter with her glasses that she found. I filled the other pockets with a little memories card and a patterned card I put a gold strip of ribbon and the Day number.
The other side was from work of what I received from the group of girls and a photo of all of us girls. Another patterned card with the Day number on it to fill the pocket.
The photos of my daughter, and the one of me are backed onto a tag doubling as a card, with added ribbon.
A continuation of Day 16 and photos of a gift I received and my daughter at school on Christmas Dress Up day with her friends.
Day 17 goes over 2 pages. At the start of the year I took photos of my daughter on her first day at school. I then took a photo of her on her last day of school and put them together in a collage to have them side by side for comparison.
The postcard type card at the top contains a little description above each photo of what her first day was like on the left and a description of what she had achieved throughout the year and what she can now do at the end of the year.
A larger photo on the right was just a photo I loved of her jumping in the air to celebrate her last day of Prep.
Another page for Day 17 shows a photo of my work breakup. I used a large gold doily which I cut in half and added a wooden Christmas tree and a little wreath sticker to the corner of the photo.
And on the right is Day 18. Which was meant to be surgery for my daughter, but it was cancelled, so we went home and spent the day crafting/getting messy with paint together.
And on the right is Day 18. Which was meant to be surgery for my daughter, but it was cancelled, so we went home and spent the day crafting/getting messy with paint together.
Day 19 shows very simple pages with a large sticker next to a photo of Tinsel our elf in the gingerbread house. And a photo of my parents dog who had surgery.
The other side is Day 19 also and shows my daughter creating a bear at Build a Bear, with lots of journaling of why we did it and how much fun she had.
The other side is Day 19 also and shows my daughter creating a bear at Build a Bear, with lots of journaling of why we did it and how much fun she had.
Day 20 was a quiet day. Just packing to go away and getting messy again with a photo of what I created.
Day 21 was a 1st Birthday party that turned into a surprise wedding, so I have lots of photos to go in for this day. A little journaling about the event because I think the photos speak volumes.
For one of the journaling tags I used a die cut star with some washi tape underneath and a little doodling around the edge of the card to 'finish' it off.
-------------------------------------------------------------------------------------------------------------------
I documented the cake and wrote about the uniqueness of it on a plainish paper cut into a 3x4" card and left the page plain and let the colours and photos speak for themselves...........................
Documenting the other little moments of the day with photos and a little journaling card....................
Because this was somewhat of a tradition and a very special event in our family, I kept the photos large (6x4") and gave them a whole 6x8" page to themselves with very little embellishing. Such as the washi tape, a sticker and a wood embellishment..........................
I had no photos for this day so journalled why and used a die cut to decorate the page. Even though I don't have photos for some days, as I get too busy and distracted, I still want to document that day in my December Daily. Sometimes I may use a quote card or another type of die cut, but I still include the number of the day on the page.........................
Simple washi tape embellishing (can you tell I love washi tape??? LOL) and some alpha lettering to emphasise that it is Christmas Eve....................
Christmas Morning and I've documented the excitement of Santa's visit, the unwrapping and the expressions on everyone's faces. I started the page off with a Santa tag and the number 25 sticker on top of glitter tape to 'introduce' the day..........................
Again, some washi tape but also the Kraft tag upside down coming out from the bottom of the photo to journal on........................
I love group photos. I love seeing the friendships we have and I love having a photo of these occasions. I've kept this photo large to be able to see the faces easier but also because it is a special moment and some journaling on why it was so special.......................
Christmas Day gave us a lot of firsts to document. All these photos were documenting the first's that we accomplished
My very last page holds a tag with personal journaling including what I loved about Christmas, the past 25 days, what was new, what we missed, what we all loved and how I felt about our December. But I won't show that here. So this is my second last page...................................
Finished!

---------------------------------------------------------------------------------------------------------------
I Love how you have used the traditional colours and the wood paper on the spine looks as though this could be Santa's book. Could have the Naughty and Nice list in it.
ReplyDeleteGreat tutorial, have often wondered if it's possible to create a home-made binder like this. It look quite vintage with all that dark woodgrain paper, very grownup and sophisticated. Looking forward to seeing what happens next.
ReplyDeleteSuch a cool tutorial on how to make the covers :)
ReplyDeleteAbsolutely fabulous!! I love that this is made from scratch - a lot of scope to do any size at all - such a great idea.
ReplyDeleteSooooo love that book paper both the read and the grey!!
I love the combination of these 2 papers, Bec.......looks very elegant with that little metal label holder.
ReplyDelete