This year's will be my 3rd December Daily. I started in 2011 after admiring Mandy's gorgeous creations and thought, I need to give this a go. Although I must admit, I did wonder how I would manage to have something to record each day. So, without jumping in too deep, I decided to go through my stash and find bits and pieces that I thought might work and made my covers from some corrugated card. It was quite small (about 4" x 6"). My page base was made from an old canvas pad I had never used and I pre-planned my pages. I remember as I went along through December, thinking - am I doing this right? Is this what a December Daily is all about? By the end of my first one I realized it's about what I wanted it to be about.
Some of my pre-planned pages.......all very basic but as much as I wanted to do a December Daily, I was still a little unsure.
and a finished page...............
and it ended up looking like this, so as you can see I found plenty to record in December.
Then in 2012 (by now I was hooked on December Daily-ing lol) I decided to go bigger and not pre-plan. I found the smaller size and pre-planned pages too restricting for me. I loved working on my 2012 album. It was my main scrappy project for December and I loved the process of creating a page for the memories I had each day. When I didn't take photos, there was always something to record.
2012 December Daily.
Tied up with a ribbon and some decorating on the back as well.
and some of my favourite pages.............
A photo of all the beautiful "red" I could see around me that day.........
Some hidden journaling in a pocket attached to my page.........
and a copy of a grocery docket...........
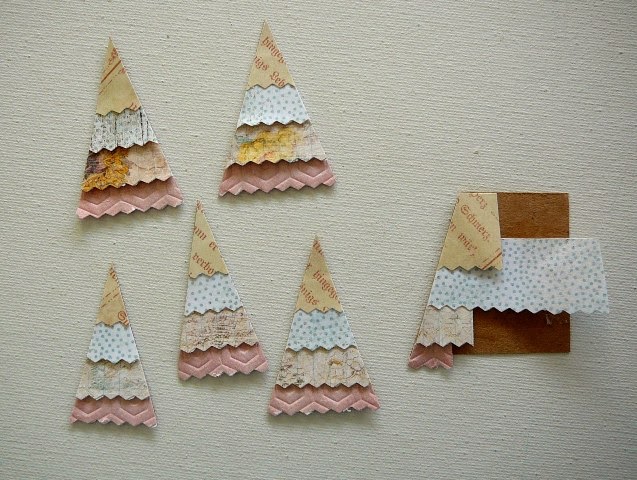
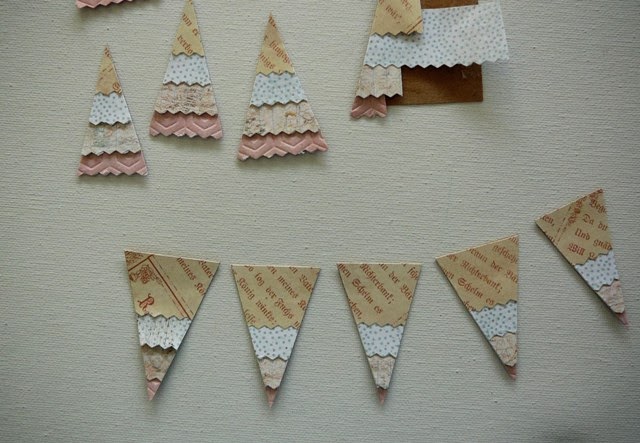
So now, in 2013 I am ready to go........covers prepared and some little embellies done. (I wanted to make a few of my own embellies this year to fit in with the pastels). It's just a little smaller than last years and I said I wasn't going to go any smaller as I loved the size last year, so we'll see how I go.
------------------------------------------
This
being my 3rd December Daily, it is probably my favourite so far now
that it is completed............that is to LOOK at, not so much the
creating of it if that makes sense. I love how it has turned out but
think the pastels will be a "one off" as I really did miss creating with
the more "traditional" Christmas colours especially red although red is
not really a colour I scrap with a lot in everyday scrapping. There
are a couple of the things I did this year that I will probably do in my
next December Daily...........Handmade dated circles and some handmade
embellishments. I mainly did this to fit in with the pastels theme this
year but really enjoyed pre-making these in the lead up to Dec 1. Also
the inclusion of some plastic sleeves (divided pockets) throughout the
album. I think it has added some interest to my album.
So, my thoughts for my 2014 December Daily...................
*Maybe
try a different look other than the rings on the outside holding it all
together. This is what I have done for all 3 December Dailys.
*Also
my first 2 were portrait orientation and this one was landscape and I
think I prefer to work with the portrait orientation. The size was good
to work with.
*Definitely no pastels (well at least not for a few years).
*Start
collecting bits and pieces right now for my 2014 December Daily so that
I have a real mix of things as I think I prefer the "bit of this and
bit of that" rather than one particular line of papers or a particular
colour scheme.
*Totally loved
Mandy's use of acetate and her little peek-a-boo pages in her 2013
December Daily so will keep this in mind for my next one too.
---------------------------------------
When I first made the decision to go with an "art journal" December Daily, it was for two reasons.....to get some practice in art journalling using a variety of techniques (tick) and to have something different from my previous December Dailys (tick again).
I didn't want to do what I have done in my previous albums - "take a photo everyday" type of thing as I was finding, for me, this was becoming a bit repetitive as I was taking similar photos each year. Instead I wanted to try to create a relevant page in an "arty"sort of way. The photos DID creep in however....probably more than intended, but overall I am super happy with how my 2014 December Daily has turned out. As you can see it's a little chunky-er than I had first thought it would have been.
I was a little concerned at first that I might have "bitten off more than I could chew" but I surprised myself at how easy it was to create an art journal page every day.
Here are a few of my most favourite pages although as I flipped through the book, there is no page I'm not happy with.
My photo extension page with Santa up the tree.........loved creating this one.......it really was soooo easy and lots of fun.
My melting snowman..........this was one day that I had to put my thinking cap on as to what was relevant to that day.........it was a nothing sort of a day but it was HOT.
So a melting snowman was born.
and this one is probably my most favourite of all.........it includes some drawings from my grand children and that's pretty special. I still have a giggle at the angry Santa looking at his list. lol
I'd have to say this has been the most enjoyable and rewarding December Daily in the four I have now created. Would I do this again for a December Daily? - ABSOLUTELY but maybe not for 2015. So what plans do I have for this year? (Yep it's this year already and I'm thinking about it lol) .......something different again. On our journey this year, I have been very inspired by Mandy's little book of lists and also by Julie's use of fabric to cover her album. So at the moment I have "FABRIC" and "LISTS" in my head. We'll see where that takes me.
I have quite a few more months to think on it.
------------------------------------------------------------------------------
I've added some ribbons to the
rings and a black elastic band around the side because.......
as always my December Daily has ended up chunky AGAIN.
I purposely pulled the spiral binding away from this Heidi Swapp album
hoping it would give me more room/flexibility with rings. Flexibility,
yes - I was able to remove and use the beautiful shaped/patterned pages
how and where I wanted and completely change the album to make it my
own. I'm happy with that.
I must say though, after having a complete change in
2014 with my "art journal" December Daily,
I thought I would be ready again this year to get back into more of
the "usual" type of December Daily that I was used to doing. Not too
sure I enjoyed the process as much as 2014's big change. 2016 needs to
be different again for me I think..........something that I haven't
done before. Maybe vintage - upcycling - a different format. Right
now I don't know EXACTLY what I want to do, but I have all sorts of
thoughts going through my head as to what I can do to make this year's
(yes this year's -2016) a little different again.
---------------------------------------
2016
Well my treasured Little Golden book is now my 2016 December Daily and I love it.
So glad I finally made the decision to give it a "new life".

It has stayed reasonably flat although probably a little bulkier than I
thought it would be considering I tried to make the pictures in the book
the focus and not add too many other embellishments.

After putting all my pages into the covers, I decided to add a strip of
white ric rac alongside the red braid that I had used when I originally
decorated my cover. I also changed the rings. Still the same type
only in their original state. Previously I had rubbed over them with
black permanent ink and wiped them back to give them a blackish/red tone
but found when I went to add them to the album, the black was still
coming off on my hands. So red they are and they look fine. With some
added bits [twine, ric rac (coloured with blue mist) and gauze
(coloured with red mist)]. Also a couple of little red plastic flowers
fitted well onto the rings so on they went.

I was happy with how I was able to incorporate the gorgeous pictures in
the book which was the plan. This page would have to be one of my
favourites.

As much as I enjoyed creating in my Little Golden Book and am so happy
with the was it has turned out, I felt almost like the pages were
pre-planned for me and I'm not a fan of creating in pre-planned albums.
For some it makes things so much easier but for me, I find I get a
little "stuck". If the book didn't have any sentimental value to me, I
would probably have created all new blank pages, cut out the pictures
from the book and used them and the pages in the book as embellishments
on new pages if that makes sense. BUT because the book is special to me
I wanted to keep it as is as much as I could.
NOW thinking, thinking, thinking......what to do for my 2017 December
Daily. Well my very first December Daily was small ( 6" x 4" ) and I
said I would NEVER go smaller again. BUT never say never, because I'm
thinking
mini for this year's
December Daily. I have a couple of ideas floating around in my head so
we'll see how I'm feeling as the year goes on. For now my
2016 December Daily will be packed away with previous years, to be bought out again in December.
-----------------------------------------------------------


.JPG)


.jpg)
.jpg)
.jpg)
.jpg)
.jpg)
.jpg)

.jpg)
.jpg)
.jpg)
.JPG)