
2015!
This is my seventh December Daily and the excitement has never dulled as each year has passed!
When finishing up my 2014 December Daily, I had fully planned to use some beautiful
7gypsies envelopes purchased at a sale and turn them into an album for 2015
with some use of chalkboard features. However (fast forward to middle of this year)......
then 7dots 'Yuletide' Collection happened to me!!!
That was that! I could not get it quick enough into my hot little hands ........
and the envelopes had been tossed aside!
(but not really - because I stumbled across a heap of December photos for 2008 - enough for everyday!!!! So will backtrack at some stage and do a December Daily with the envelopes!! Cant have enough December Daily's I reckon!)
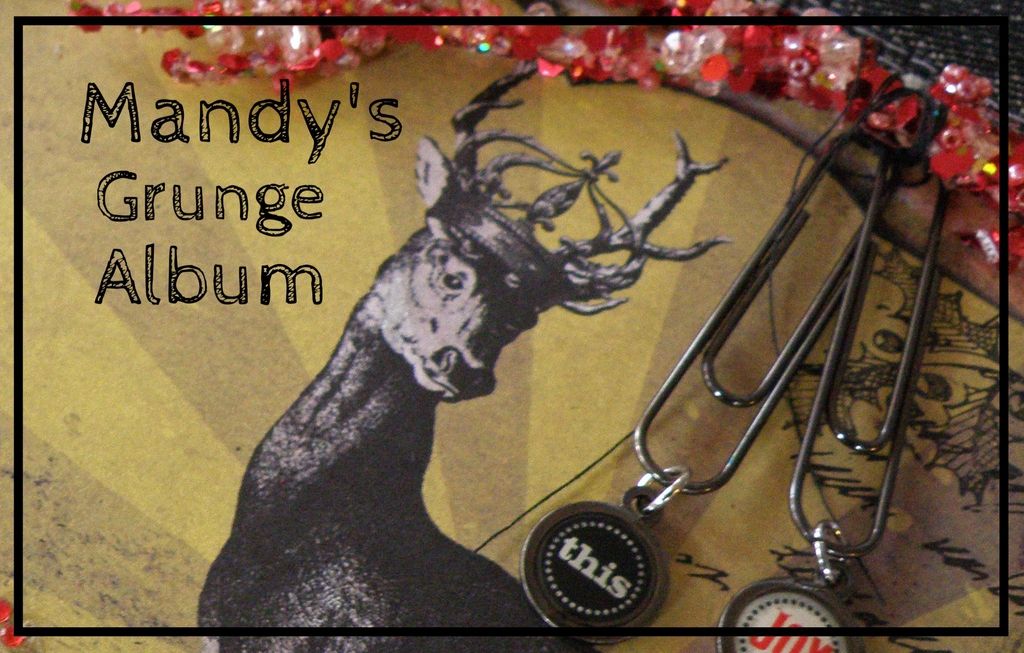
Cover
This beautiful Yuletide paper is now glued to 12x6 chipboard covers this year which also includes the use of black denim fabric.

It was an instant love affair - love at first sight, and when I received this gorgeous collection- instant gratification and sense of feeling justitfied!
(It wasnt in Australia at this stage so had to source it from the US - Strwbri Etsy )
I love its 'Grungy' feel! So, grunge it is.... and.... ooooh that deer!
I felt I'd put myself back in square one changing ideas from the beautiful envelopes ideas of last year - sooooo back to the drawing board with my new goodies! Then it became a matter of finding something to become the 'covers'... and I managed to find these black chipboard covers on sale online for next to nothing in cost and with a bit of black denim, the vision was dancing in my head....I really liked the thought of a landscape look this year, and 12x6 size suited just fine! Just had to cut a bit off as these were 13ins long...

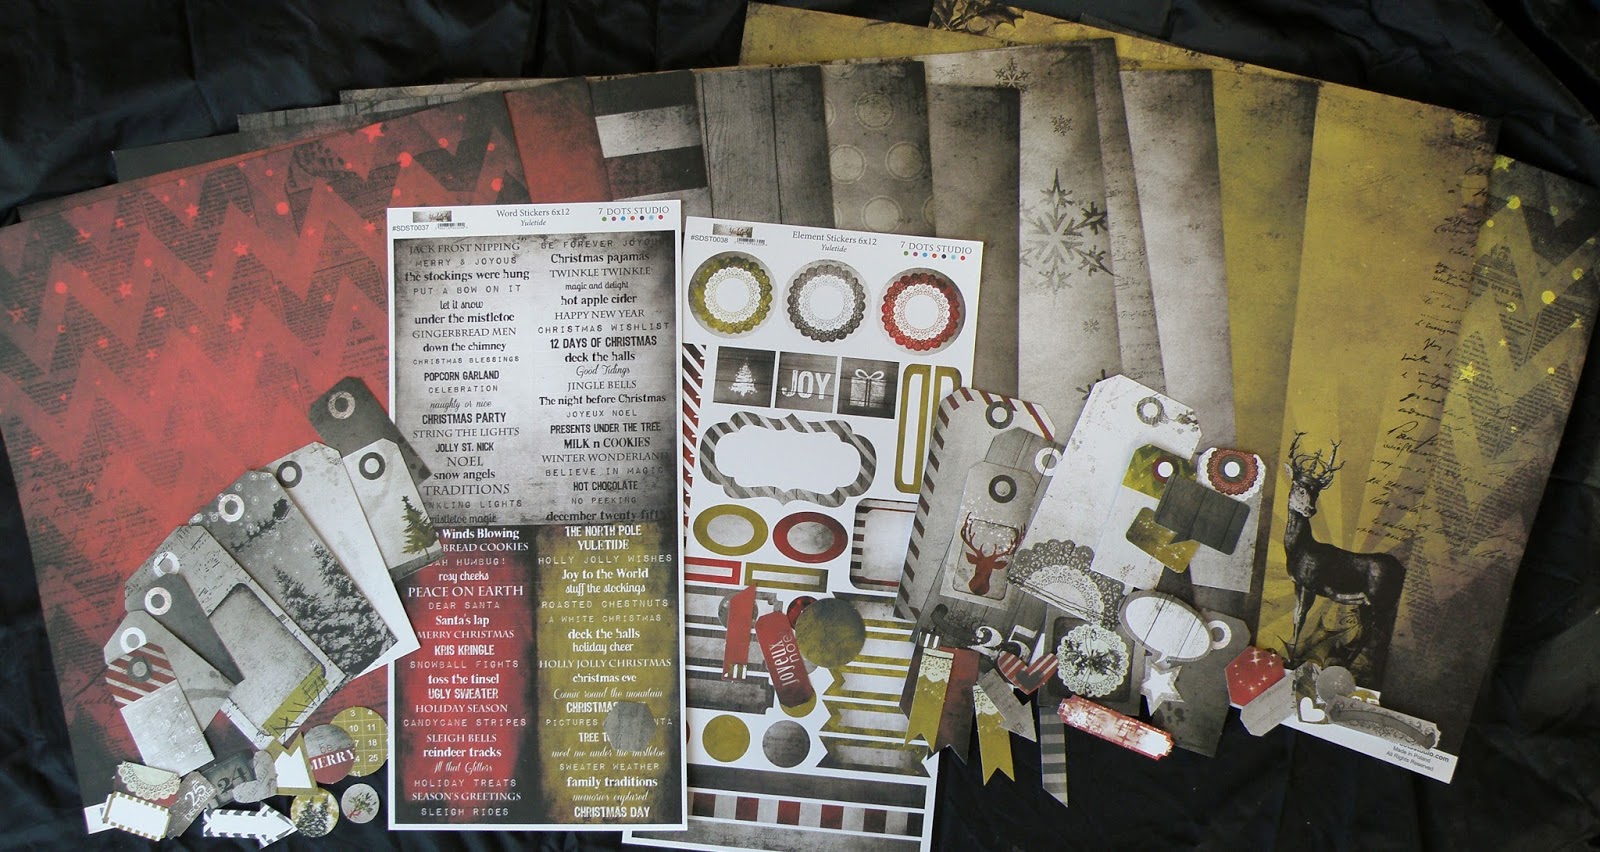
So the gathering the rest of the stash!
There is nothing like shopping your own stash! I keep my Christmas stash
in a tub of its own.... so with some mixed media.... here's some
pics...EXCITING! 


Will make it up as it goes along! I'm not terribly good at planning ahead!
I think I'm in love with deers this year!
-----------------------------------------------------------
I've enjoyed every moment of creating this!
Size is 12x6ins - landscape
Size is 12x6ins - landscape
It came together easily by gathering what I thought would be useful on the cover....
(there is a back scalloped cover too)

Measured the 7dots Yuletide deer paper to the black chipboard scalloped cover

And also measured the black denim with the raw edge showing and the same amount of fabric is folded in half over the back
(where the large eyelets will eventually go)
Cant stick anything down yet......thats why it looks crooked :)

The deer paper and the denim need sewing together....
sewed two rows in white thread hoping it would stand out.
You dont have to sew... you could just stick it down :)

Next a decorative paper edge was pushed under the frayed edge of the denim, and some vintage ricrac was loosely glued to the bottom of the deer paper.....

Here I changed the thread to black thread and sewed the ricrac down in two rows.

Here's how it is looking.. .and needs a trim up along the sides....

There's an extra trim added to the chipboard cover... it's a bit washed out but actually says...
'O'ver hills we go, laughing all the way......' etc (Jingle Bells song)

All glued down...

Underneath the '2015' is some grey gauze..

And a little holly stamp to dress up a corner or two....

Time to decorate and pop in some eyelets, rings and trims!
Old prima sparkly branch and some gem stones....

All done!!

-------------------------------------------------------------------
PREPARING AND CONSTRUCTING THE PAGES
This came together quite easily.

Here's a bit of an overview... at the very back is the cover, the one in the middle is the back cover (left plain for now) and the one in front is a page newly constructed. The 12x12 stripe paper (from 7dots Yuletide Collection) underneath is about to be put together
as a page as an example a bit further in this post.

The pages will sit in the album like this:

And when its opened up.... the reverse side is this lovely white/black grunge

Which will contrast so well with the Christmassy red and white stripe...

Now onto how to construct the pages....

A quick press with the iron so it will fall evenly in half, and some spots of glue to hold it in place at the top of the paper.....

Slip the paper in between the folded denim and sew two rows

Next is to mark out the eyelets (these are large ones bought from a hardware store)

I've made up quite a few pages, a full red one which will contrast with the red and white stripe and

A collection of pages ready to go!!

One of the transparencies might work a treat as a cover page maybe?

The thickness of the denim and the eyelets are going to allow space between pages some layering and texture which is great. I've still got the idea in my head I might trim the bottom edge of each page with colourful fabric if it suits... but that will wait until the page is complete
with photos etc so thats hanging in the balance.

The Christmas decorations will come out, and my past December Daily's will soon grace the coffee table again. I love how each one is so different and how each one becomes such a conversational piece with friends and family.
---------------------------------------------------------------
DAY 1
I set up a little blackboard with baubles and bits on my mantel to welcome in December!

Here's my inside cover page- the upper black part (not to waste any space!)

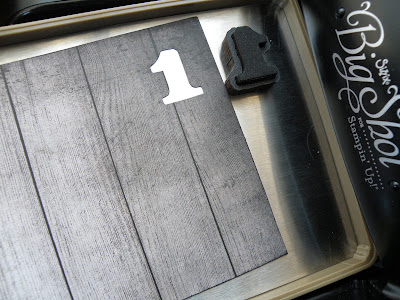
Just love the look of this 7dots Yuletide weathered timber boards -

Using Mover and Shapers numbers... cut out the no.1
Now in place - added the silver and black tinsel leaving the scalloped edge of the cover revealed.

And these wonderful little dies on glitter paper put through the bigshot!

With the words glued down on some silver stars, sequins was added to give extra sparkle


LOL, why the 'bah humbug!' weeeell, I just love it .
----------------------------------------------------------------------


-----------------------------------------------------------------------------
Day 4....

This time I've cut out a hand-drawn star as a peek-through...


Here's how Days 3 and 4 look together:

Day 5
Day 5 is the reverse of the page above... and this time its Blackie from Day 3 peeking through :)
It's almost like, 'while I'm at home... this is happening.....'

Dangle and glue a couple of ribbons to 'hang' a couple of photos on each


The two pages together...

Day 6

Day 7

These old Prima leaves got a spruce up by sewing a black stitch up and down its centre, adding a pearl and sequin and stitching them to the actual page too. If you dont use a sewing machine, a hand stitch would look just as effective too!

Here are page 6 & & together...
the deviation of the blue now with the green doesnt look too bad at all!

--------------------------------------------


------------------------------------------------------------


Fibre gives another texture layer to a page... and who doesn't love a little bit of sequin!

Day 15

I havent done it yet, but dont forget to also layer on some Dimensional Magic on the paper embellishments (or rough glitter embellishments) to add that smoothess and 'polish'.

Day 16

Little jars can be filled with anything festive and be a great addition to a page!

Day 17

Took the colour out of the photos to keep a 'dark' feel.

Day 18

You can build up a Christmas tree by using up stickers or diecut sentiments

And had some giggles cutting out the Grinch's hands found on the net...

Using watercolour pencils, it can add definition to paper. Here I've added black on the list and around the figures on the background papers. A touch of green on the ivy leaves and red on the berries too.

Sparkly Smooch - as you can see, its still wet here.. but once dry, it looks like a sparkly treat!

This definitely was a fun page to create!


Here the page is closed and you can see through to the underneath page

I had this great transparency from a while back from my 'Messy Box' by 'A Beautiful Mess' subscription, so it got cut down and had the black denim fabric spine sewn to it

and added a little gold pocket full of sequins and stars just for interest.

I cut the top off where the ties are and sewed it across the top of the page where the seam is on the black denim, the little bag can be flipped up,.

Day 20

As you can see.... it holds lots of photos of cousins, grandparents, parents, aunties and uncles!

Day 21

Day 22

I've only got three colours of this Stampendous range... but I'll be adding MORE!

And the white...

Okay... my new obsession!

Day 23


Used a left over envelope from Christmas, but with some of the 7dots Yuletide scrap paper glued to the inside so when the flap was lifted it didnt look the 'stark' white it was against the rest of the rustic page.


Oh and dont faint (for people who know me) I've used rub-ons! And for once they didnt go haywire!


-------------------------------------------------------------------
Afterthoughts:
What a process this 2015 album was!

Sewn are 14 pages with spines of black denim plus the covers...
What I cant believe is even with the thickness of the spines and large eyelets, it actually

What I did miss was the inclusion of 'lists' of everyday smaller detail of things.


What's next for 2016? Not 100% sure, but I do have a few ideas swirling in my head...
-------------------------------------------------------------------

PREPARING AND CONSTRUCTING THE PAGES
This came together quite easily.
I did straight stitching with these, but by all means...
the pages still can be constructed by using strong glue.

Here's a bit of an overview... at the very back is the cover, the one in the middle is the back cover (left plain for now) and the one in front is a page newly constructed. The 12x12 stripe paper (from 7dots Yuletide Collection) underneath is about to be put together
as a page as an example a bit further in this post.

The pages will sit in the album like this:
(with a bit of the scallop showing)

And when its opened up.... the reverse side is this lovely white/black grunge

Which will contrast so well with the Christmassy red and white stripe...

Now onto how to construct the pages....
Each 12x12 is cut in half... to 12x6ins. This gives two pages to each
12x12 - bonus! No paper wastage! The black denim I bought from
'Spotlight' and asked the lady at the counter to cut it 30 cms wide and
as straight as she could... so I've barely had to trim off the ends!
The denim is cut here at 7cms

A quick press with the iron so it will fall evenly in half, and some spots of glue to hold it in place at the top of the paper.....

Slip the paper in between the folded denim and sew two rows

Next is to mark out the eyelets (these are large ones bought from a hardware store)
by placing the already constructed page on top and marking through it.
You can just slightly see the markings.

I've made up quite a few pages, a full red one which will contrast with the red and white stripe and
of course where would I be without my transparencies!! These are some old Hamley Screen Graph Prints.... nicely grungy too!

A collection of pages ready to go!!
(so excited!)

One of the transparencies might work a treat as a cover page maybe?

The thickness of the denim and the eyelets are going to allow space between pages some layering and texture which is great. I've still got the idea in my head I might trim the bottom edge of each page with colourful fabric if it suits... but that will wait until the page is complete
with photos etc so thats hanging in the balance.

The Christmas decorations will come out, and my past December Daily's will soon grace the coffee table again. I love how each one is so different and how each one becomes such a conversational piece with friends and family.
So happy another one will be making its way among the mix!
---------------------------------------------------------------
DAY 1
I set up a little blackboard with baubles and bits on my mantel to welcome in December!

Here's my inside cover page- the upper black part (not to waste any space!)

Just love the look of this 7dots Yuletide weathered timber boards -
and felt it suited the rustic-ness of the photo.

Using Mover and Shapers numbers... cut out the no.1

Now in place - added the silver and black tinsel leaving the scalloped edge of the cover revealed.

And these wonderful little dies on glitter paper put through the bigshot!

With the words glued down on some silver stars, sequins was added to give extra sparkle


LOL, why the 'bah humbug!' weeeell, I just love it .
----------------------------------------------------------------------
Day 2
Here I've used one of my transparency pages.
These are older Hambly Screen Print transparencies.
(So very difficult to photograph without reflections but I've kinda managed! )

Day 3
You can see Day 1's page in the background which is fabulous...

Here's how the two pages (day 2 &3) work together back to back.
A single layer of acetate...

I printed and cut matching sized photos to go back and front on the acetate.

The same with the black chalkboard journal block with I cut in half.
I had two full sized journal blocks - so that worked well.

Caution!! Made the mistake here of having 'upside down' photos when the page was
flipped over... these pics need to be up the other way!

Adding a clear piece of acetate on the underside of the Hambly Screen Print,
so the sequins could be trapped inside to become a 'shaker' page.
I placed the sequins in between the two pages before any sewing -
the static electricity held them in place well enough.
(yep these photos still need to be turned up the other way- hadnt realised at this stage yet either!)

Sewing two photos (top and underneath) in place stops the sequins
falling and becoming trapped behind the photos. And repeated with the
other two sets,
then sewed around the outside edges of the page.
(The gold light on Paige's face is from the sewing machine light reflecting down)

Day's 1 and 2 together...
(now the silver stars are reflecting awfully!)
The sequins look green here, but they are actually pewter grey.

Day 3
With the photos up the right way! How after sewing them wrongly???
Weeeeell, take a closer look!
You can see I reprinted, inked and stuck a slightly smaller photo on top of the upside down
ones to keep the sewn edges seen!
And to be honest... it turned out really effective!! A great mistake in a very good way!

-----------------------------------------------------------------------------
Day 4....

This time I've cut out a hand-drawn star as a peek-through...
(hard to get those angles right - I'm not much of a 'measurer', most of
what I do is by 'eye' so it will never be perfect - and that's kinda
adds to a rustic style :) )

Managed to place a photo of Paige in full flight in the page underneath
so it gives a hint of what's happening on the next page overleaf......

Here's how Days 3 and 4 look together:

Day 5
Day 5 is the reverse of the page above... and this time its Blackie from Day 3 peeking through :)
It's almost like, 'while I'm at home... this is happening.....'

Dangle and glue a couple of ribbons to 'hang' a couple of photos on each


There were quite a few rehearsals/performances so have condensed to a
couple of days because so many other wonderful things were going on too!
Sometimes its hard to 'share' pages with other events or daily
happenings so I try to prioritise to make sure the December Daily ends
up well rounded. 

The frame on the right was mainly blue so rubbed a bit of the Dazzlerz onto it.
This paper frame came with the overlay on the right. (Basic Grey - Take Note)

And this is the peek-through picture
Again, the transparency is hard to photograph so looks a bit washed out.

The two pages together...

Day 6
There's four transparency 'corners' on this page to hint some definition.
You can also see a hint of the trim used on the day before's page peeking out at the top here.
Ooops, managed to sway away from my colour scheme here and add blue! (It was bound to happen!)
You can also see a hint of the trim used on the day before's page peeking out at the top here.
Ooops, managed to sway away from my colour scheme here and add blue! (It was bound to happen!)

Day 7

These old Prima leaves got a spruce up by sewing a black stitch up and down its centre, adding a pearl and sequin and stitching them to the actual page too. If you dont use a sewing machine, a hand stitch would look just as effective too!

Here are page 6 & & together...
the deviation of the blue now with the green doesnt look too bad at all!

--------------------------------------------
Day 8
First off..... I have to apologise for the quality of these photos...
but oh my!! Trying to photograph transparencies on a bright day -
weeeeeell, I cant even begin to count how many photos I've taken! These
are the best of a bad lot! All I can say, is the use of transparencies
(seeing in real life) is fantastic and adds a wonderful dimension to
your album! Just very hard taking photos of it!

These are Basic Grey 'Take Note' overlays.... love them!
And running a 'bauble' trim along an edge of a page works a treat too!

Day 9
This is a full page transparency (old Hambly Print Screen) so the photo
and matting is front and back of the transparency, the black number and
journal block is front and back - so is the die cut negative frame, the
word strips and the stars - all front and back. The only thing that
isnt are the wreaths which can be seen through on the next page.
(Ha you can also see the start of a new page beyond that!)

Day 10
Here you can see the front and back matching up.
I really love the peek-a-boo effect that happens with acetate... I love
that Paige can be seen waving through a few pages - so despite the
struggles with photographing... it has its charm!
Another thing that can finish off a page especially too if you are
using glitter paper - is to use Dimensional Magic. It smooths the
coarseness (and the loss of glitter bits) and creates a 'polish'. It
looks great on the word strips and below I've popped it on the flat
chipboard stars too.

------------------------------------------------------------
Day 11

Using some wide calico fabric(also stamped), it becomes a 'pocket'... it looks like the photos are tucked in behind with other bits and pieces. Around the outside is stitched with black thread.

The tree is a cut from a die, and the ornaments are fabulous little brads!
The strip of reindeer names is washi tape along the bottom.
I've also tucked a tag into the pocket for some hidden journaling.

Day 12
Time to trim the tree.. always a great page for content!

I had so much fun with the little tree... it's actually two trees (green glitter paper)
cut from a die (Intricut Dies - Christmas Fir Trees - bought from LSS) placed one on the other..
then sewn down the middle to give it a little more definition.

The bauble trim (Forever Friends Dome Border) had to be cut apart one by one to add to the tree for decoration

Day 13
This turned out quite 'silvery' and added some hidden journaling on a tag.

Oh boy.. am I EVER in love with these dies!!! (LeCrea 3D Dies - Pine Cones)
I cut one lot with silver glitter paper and another lot in grey cardstock, then swapped over every second bit in a little cone-set. How effective it's turned out!

Definitely a favourite!

Day 14

Fibre gives another texture layer to a page... and who doesn't love a little bit of sequin!
A row of vintage ric rac finishes off the page.

Day 15
Layering a little banner is always effective..and using arrows that move the eye across the page.

I havent done it yet, but dont forget to also layer on some Dimensional Magic on the paper embellishments (or rough glitter embellishments) to add that smoothess and 'polish'.
(I ran out of drying time and light before photographing, but its on now :) )

Day 16
There's always some fun to be had with tags and bottles. These tags
came from 'typo' so with words like these, it was an opportunity to land
my scrappy friends in it!

Little jars can be filled with anything festive and be a great addition to a page!
I dont know how old these Kaisercraft stars are...but let's say OLD
(picked them up really cheap) - and yet still super perfect for a
December Daily!

Day 17
Managed to get a 'poster' off the internet to head this page up.
It even said 'December' down the bottom!

Took the colour out of the photos to keep a 'dark' feel.
Happy to use lots of 'star' stamps and embellishments!

Day 18
Ever since 2009 when first starting December Daily's, I got the girls to
fill out a Santa's list which only a few days ago after looking through
the Dec Daily's on the coffee table - they had a good laugh! My, their
tastes have changed and I'm so pleased to have documented that it once
was about wishing for 'Singstars and DS's etc along with some cute other
bits and pieces.

You can build up a Christmas tree by using up stickers or diecut sentiments

And had some giggles cutting out the Grinch's hands found on the net...
It adds a fun element to the page.

Using watercolour pencils, it can add definition to paper. Here I've added black on the list and around the figures on the background papers. A touch of green on the ivy leaves and red on the berries too.
A great big golden 'H' (and a 'P' for Paige) is another great element to add to a page. I watercoloured around these too.

Sparkly Smooch - as you can see, its still wet here.. but once dry, it looks like a sparkly treat!
Love this stuff for little understated areas.

This definitely was a fun page to create!

Day 19
Another transparency page! Got to love them!
Another transparency page! Got to love them!
It's always good to remember to get your pets too into your December Daily
Yes... this one is a pet, though its great to get your local wildlife too!

Here the page is closed and you can see through to the underneath page

I had this great transparency from a while back from my 'Messy Box' by 'A Beautiful Mess' subscription, so it got cut down and had the black denim fabric spine sewn to it

and added a little gold pocket full of sequins and stars just for interest.

I cut the top off where the ties are and sewed it across the top of the page where the seam is on the black denim, the little bag can be flipped up,.

Day 20
The underside of the transparency..... and you can see through to the
page where the 'grinch' hands are! LOL Because this was an early
Christmas family gathering, there were a lot of photos I wanted to
include, so behind the double photo is a pocket where little stars are
poking out. These little stars are attached to more photos. The photo
of 'Chirp' on the other side of the transparency is the same size as the
the mounted double photos on this side - so all is concealed well.

As you can see.... it holds lots of photos of cousins, grandparents, parents, aunties and uncles!

Day 21
Both my girls sung in the choir for Carols by Candlelight, and taking a
long range lense made all the difference to be able to get those close
up photos. Otherwise, that last photo down the bottom would have been
the best I could get!
My lense isnt the best in the world, but at least I got what I needed for my page!

Day 22
OMGosh... I had the best time with this page! Probably unlike a lot
you who are really great at stamping and embossing - I'm a complete
beginner.. but I got into this and the result...weeeeell I dont think I
can put down that Stampendous Embossing Enamel!
Look at these trees!! (the blue and white ones) The red one is another
brand....still quite good and I toned it down by adding some white gel
pen, but not quite like Stampendous! All just perfect for my little
handmade figures!

I've only got three colours of this Stampendous range... but I'll be adding MORE!
Look at those specks through the gold tree!! What a joyous surprise
this was! I couldnt believe my eyes as the heat gun moved over it (you
probably already knew this - but still - I was gasping!)

And the white...

Okay... my new obsession!

Day 23
You know how you get close to Christmas day and there are still many
thing to do or on your mind, and I guess for us December Daily-ers, its
about capturing what goes on at home - and sometimes its a lot all in
one day.... so this was the day for me, with the wrapping of presents
(yes finally), displaying my December Daily's (yes, I always try to,
love how they look together), what the girls were up to, and out in the
garden (do try to get some photos of what flowers are out at this time
of year too) So here I wanted to put a token of each in photographs.

This was another transparency page... a gold diagonal stripe.
I've got really quick at running these pages up ready for use now :)

And I really love 'Viva Inka Gold' and edged the outlines of each photo and their little
black mats plus the outline of the actual full transparency
(after it had been edged with black stazon ink)


Pretty stuff isnt it!
I've matched the size and placement of the photos on the front to the
ones that will be going on the reverse of the page for 'Day 24' , also
with the journaling block which I had two, so they matched.

Day 24
Oh boy this was fun! I love to use 'jibjab'
an ecard site to send out a funny little family animation of my
family... so with this page, I grabbed screenshots to remember this
ecard by. All set out in the six squares matching the 23rd page.....

but there were so many fun ones I couldnt leave out,

I had to make the top photos into pockets!

and this funny cute cut-out because in the ecard,
one family member slipped off the roof!

It's great to have some fun with pages!
Day 25
Christmas day is a very big one for us,
visiting family and friends part of long held traditions for this day.
visiting family and friends part of long held traditions for this day.
Our day is always divided up into three sections, therefore three pages in my December Daily.
The first page - is at home... 

There were four photos (two on top and two underneath) I wanted to
include, and mounted them on some of the black denium I've used for the
binding of each page.
Tore a piece of 7dots paper to use as part of the background too
Tore a piece of 7dots paper to use as part of the background too

but to also sew the black denim mounted photos to it before sticking down.

I tried to sew around my photo to the denim, but I cant ever seem to
keep the photo in place without it sewing screw-ifffff no matter how
much I stick it down underneath to hold it in place! I unpicked the
stitches and gave up! Lucky it was the photo hidden! A stitch here and
there works better!

Attached some little apoxy tags to some olive green twine (I cant tell
you how old these are! Sometimes our scrapping products come around in
fashion over and over!)

Day 25
(2nd Page - Lunch)
I managed to take lots of photos this year and started to really feel
that with aging grandparents and adult children becoming independent,
every Christmas spent together is more and more precious. So trying to
capture their essence of Christmas is so increasingly important.
An envelope is a great way to pop in all those extra photos.

Used a left over envelope from Christmas, but with some of the 7dots Yuletide scrap paper glued to the inside so when the flap was lifted it didnt look the 'stark' white it was against the rest of the rustic page.

Works a treat!

Oh and dont faint (for people who know me) I've used rub-ons! And for once they didnt go haywire!
I usually avoid them like the plague because we simply do not get on!
Must have had the Christmas fairies looking after me!
Rub-ons do give another wonderful dimension for this I agree!

Day 25
(3rd Page - Tea)
Again there were quite a few photos to be included. Its not for
everyone, but I really love it so created three waterfall-effect rows.
The 7dots paper is quite heavy weight and handles the amount very well.
The 7dots paper is quite heavy weight and handles the amount very well.

The photos are attached by washi tape back and front.
(I did put on a little extra glue to keep the washi from coming off later on)
I've printed the photos to a specific size on my printer leaving a white border.

The transparent Christmas tree is Fancy Pants (I think), and to dress it
up, I've stuck jewels on some of the dots with a '25' brad at the top.

Day 26
The added pompom trim really dresses up the album...

Day 27/28
I usually finish up on Boxing Day, but we had two more days of being
away visiting two sets of really close lifetime friends that I've
included them too.
I envisaged doing some sort of door like page - that opened into their lives that we share...
with a date on one side of the door and their family name (obsured-sorry) on the other...

Doors open and an array of sized photos can be used.


And some little red brads for door handles :)

This is where my December Daily ends..
There is a little note in white in the bottom right corner that simply says
'29th Jan - Home'
-------------------------------------------------------------------
Afterthoughts:
What a process this 2015 album was!
It's so different from my 2014 album (altered vintage book)
This one was made from scratch and I loved all its possibilities!
Mainly made from 7dots Yuletide collection...it also has quite a few old
Hambly transparency pages too. The size of 12"x6" was perfect for the
kind of scrapper I am - I like to include a lot and am so happy with the
space to fill! Spreading outwards, kinda stopped it from spreading
upwards (chunky)!

Sewn are 14 pages with spines of black denim plus the covers...
Large eyelets and bendy large screw bands to hold it together. (metal jump rings just didnt work well)


What I cant believe is even with the thickness of the spines and large eyelets, it actually
remained fairly flat - but I didnt really 'scrap flat' so somehow the constraints took it on board
and afforded enough room thickness-wise, even with pompom trim and all!

What I did miss was the inclusion of 'lists' of everyday smaller detail of things.
Last year I worked with a separate smaller vintage book - December 30 Day's of List's
and thought that this year instead of working it separately, I'd include it somehow...
I forgot....
until Deb had included a list in her December Daily
so smacking my foreheard with the palm of my hand,
realised it was too late - I'd gone too far to include it throughout!
Oh well (shrug) next time!
One thing I did do now its finished was went through with the
Dimensional Magic and put a lacquer of it on anything that was a
cardstock label, glitter (whether it be stars, numbers or outlines etc)
and anything that needed a subtle standout of some kind.....
Yes, even Dimensional Magic-ed my deer on the front cover!
Yes, even Dimensional Magic-ed my deer on the front cover!


What's next for 2016? Not 100% sure, but I do have a few ideas swirling in my head...
like.... maybe a black paper bag album - I could include my 'lists' well
into this and even more use of transparencies! I want to do more
stamping and embossing with enamels too!
We'll see, who knows what products/techniques might turn up yet
throughout the year that might be worthy of December Daily-ing!! :)
Whatever it is, there's never a definite goal (other then finishing),
just a heap of ideas that take twists and turns throughout the process
and all I can do is cross my fingers that it might turn out!-------------------------------------------------------------------
Dont forget you can link your pre-planning or stash photos up
HERE....
And if you have your Covers done....
upload them HERE
And you can even share your previous December Daily's
HERE
HERE....
And if you have your Covers done....
upload them HERE
And you can even share your previous December Daily's
HERE
We'd love to see them!
Beautiful!
ReplyDeleteI just LOVE your cover, Mandy and what a fabulous size Dec Daily to work with this year.
ReplyDeleteLooks fabulous. Especially the denim idea.... ADORE!!!
ReplyDeleteStunning! Love the denim and all the stitching. Huge admiration for your creativity!
ReplyDeleteI agree this looks great! So many details and the size looks like a fun one to play with :) Love that black denim and the sewing you did, just gives a nice cozy feel and look at those charms with the paper clips :) hmmm I'll have to remember that when I', using my charms such a great idea :)
ReplyDeleteThis looks AMAZING!!!!!!!!!!!!!!!!!!!!!!!!!!!!
ReplyDeleteOoo your cover looks wonderful! It is going to look fabulous!
ReplyDeleteThat's fab! Wasn't really keen on the grunge style but I love it xx
ReplyDelete