


THE KIT AND IDEAS
Number eight!
And every year I never get tired 'with what to do next'.
In my basket of December Dailys brought out with the decorations each
year, what has ended up an eclectic group of albums colourful and
inviting, family and friends tend to paw through them! I love hearing
'I remember that!' and 'Look at us!' So each year, a different style
in colour or size, orientation and ideas seems to fit us around the
coffee table!
Sigh... I was such a fan of Basic Grey in its glory days and to think they are no more is just sad.
SO, why not base my 2016 December Daily on Basic Grey - like a tribute (or something) and this ONE paper set the stage....
SO, why not base my 2016 December Daily on Basic Grey - like a tribute (or something) and this ONE paper set the stage....

It's Basic Grey's Jovial 'Coal' and the colours just POP, and set about collecting
'Jovial' papers,

but also other Basic Grey solid colour paper...

There was already quite a bit in my stash! Must have loved it way back
when the ranges were released! And some embellishments (of course
there will be some non-basic grey too)
Paints, stamps and embossing powders - oh my! Yes, and a little bit of 'Jovial' fabric!
Got some ideas on that!
Paints, stamps and embossing powders - oh my! Yes, and a little bit of 'Jovial' fabric!
Got some ideas on that!

Set up ready to use:

Hopefully, with my bases being black, the use of black and white photos
will be enhanced by all this colour. My fingers are crossed that I
stick with this plan! Let's see what happens!
----------------------------------------------------------------------------------------
THE COVERS
This cover is so different to anything I've played with before.
I love 'doors' and the thought of using actual wood (balsa) was one of those moments of it will either turn out out okay or be an epic fail (along with the ideas) being flung to the far back of a forgotten cupboard! Weeell it did turn out, better than expected! Even moreso, it was REALLY easy!!!
Off to the hardware store (did have dh with me, he loves Bunnings and handy for advice too!)
And home I came with some balsa wood 'planks' They dont weigh anything!

I didnt even know what size I wanted by this time, so with an old steak knife (yep..worked a treat!) sawed through and it's turned out 11x8inch, so the inside pages will be10x7" Not really convensional though it doesnt matter much to me - just liked the look of the size :)
(You might have guessed by now, I'm not a 'measure-er' but rather an eyeball over it and yep...thats-it kinda scrapper! Not that I like tardy or close-enough-is-good-enough... I guess I have a good 'eye' which makes up for numbers doing my head in!)
(You might have guessed by now, I'm not a 'measure-er' but rather an eyeball over it and yep...thats-it kinda scrapper! Not that I like tardy or close-enough-is-good-enough... I guess I have a good 'eye' which makes up for numbers doing my head in!)

Also didnt want the 'planks' to be all the same size either, so split one up

Placed together, you might notice I've cut some little chips out the ends too, for a rustic, old type of look. Also didnt want the edged of the wood fitting 'tidily' together - so scraped them abit scrappy!

Paint fun! I actually used Viva 3-D Stamp paint for this (Scrap Therapy has it)- it had a good thickness to it and that blackboard look. I love it. It also need a couple of layers of Glaze sealer

And some Kaisercraft blackboard card (its quite thick and solid) to pack the covers and hold the wood together. Also repeat the whole process for the back cover too :)

Punched out some holes with my Crop-A-Dile - punched through as easy as paper!

Next the brackets for the door... chipboard covered with Stampendous Frantage embossing enamel in the Aged Silver

The result: before and after.... oh and I'd already measured the brackets against the cover holes and punched out the same holes for the binder rings with my Crop-A-dile too before embossing.

This time Shabby White for the year - chipboard numbers ( LOVE this stuff!!!)

The photos really dont do it justice ...

It was just a matter of dressing the number plate, some stamped little cardinals and foliage diecut (both done from Basic Grey's Jovial paper)

Weeeeeeell, thats the covers done....
next are the pages! I'm really looking forward to constructing those!!
Get out those lovely poppy colours of the old basic grey backgrounds!
----------------------------------------------------------------------------
THE PAGE PREPARATIONS
Its time to prepare my pages, and have to say, this came together quite easily.


-------------------------------------------------------------------


--------------------------------------------------------------


------------------------------------------------------


----------------------------------------------------


To try to capture this for my December Daily... I kept hitting the pause button and snapping a shot,


--------------------------------------------------------


DAYS 14 & 15


DAY 16

------------------------------------------------------


-----------------------------------------
Day 21


------------------------------------------------------

The white Christmas trees on the transparency arent covered up as much on this side,


I've been asked why I go to the trouble, but I really enjoy making my own.
And this year is an added treat for me, something I've always wanted to dooooo....
will reveal just a little bit further down!
(So excited!)
Now, back to the pages!
It's just straight stitching with these, yes, its fabric but by all means...
the pages still can be constructed by using strong glue and paper.
I'm trying to stay with a black base and a strong pop of colour!
Really, really need to add more blue and yellow yet 😊 and will!

So its starts by measuring, cutting my Basic Grey (mostly Jovial) paper
to the size of my covers (its not a standard size - its a 'I like the
look of this size' and cut it so)
Using the good ole Crop-A-Dile, placed some eyelets too

---------------------------------------------------------------------
Okay... we need to do a little detour...... (did I say I was excited!)
The fabric is Basic Grey 'Jovial' and it appealed because of its lovely
bright colours with a black base in some of its patterns and this is
something I've been wanting to do for a very very long time...
Make a quilt!!!!
And keeping in mind that I'm a complete beginner at this, I made the easiest choice possible.....
with a Basic Grey 'Jovial' jelly roll! Isnt it gorgeous!

Look at it's lovely patterns and colours!

And sewn up! YAY!!!! (omg!! in love, in love!)

So its left me with some wonderful bits of fabric to go on my December Daily
and the inspiration for my page edging and the 'Jovial' paper to go in my December Daily
Oh gosh... imagine that ... I'll have a matching quilt and December Daily!!
But great to do something wonderful with the scraps!
----------------------------------------------------------------------
OKAY... back to the pages!! (again) LOL
Firstly, to make the pages stronger, I decided to 'back and front'
them. The stripey pattern will be on the inside. This paper is Basic
Grey's Oxford 'Letterman' it was a great 'light black' (is that a good
explanation???) for my 'hopefully' black and white photos later on!

and then the blacks are on both sides of the pages

Time for the edgings... (those snowflake strips I actually took out of
my quilt pieces cos I didnt like them and replaced them with black. They
seemed too stark next to the rest of the patterns! But I think they
'might' be okay in my Dec Daily... we'll see :)

So pick a piece of fabric, and iron over some of the edges of the fabric - the selvages were fine
and glue the paper and fabric edge together so they stay put while sewing....

And through the sewing machine a few of the pages go!

Even did a transparency (will definitely be doing more of these!)
This is an old Hambly Screen transparency that every now and then you could be lucky to pick up!


Even, cut out the 'Jovial' paper doily to form a page

Here's the covers and pages spread apart.

Just got to make some more pages with blue and yellow edging and some more transparency ones and it will be all ready to go!
-------------------------------------------------------------------
DAILY PAGES
DAY 1
I've got my first page done, and I couldnt resist going straight for the transparency!
The transparency looks great with the black inside cover behind it!

Even though old Blackie isnt well, he gave me this lovely expression this morning,
perfect for the first page(dont forget to include your family pets in your December Daily)
So added the wording with my photoshop elements.
He obviously couldnt see what all the fuss was about !

I actually had a great run this morning with photographing the transparency,
I usually have a grand battle with reflections and glare!! With the latter always winning!
Placed the photo in the middle of the page.......

I really love this Basic Grey Jovial Doily diecut and decided that this will be the cover page.

I'm not at all sure what to do with it yet, but the 1st of December transparency page will sit behind it.
Do you see something peeping through????? That was accidental!

Here's a closer look....LOVE it! Blackie is so shy, this is perfect for him!

Because I'm basing most of my December Daily on Basic Grey's 'Jovial'
Collection, out came a great Star die because this will make a lovely
group of various sized stars to go under the photo.
There is only two sheets of 'Jovial' (Merrymaker, Nice) here - the photo
shows the reverse sides of the paper too which I've used four different
patterns for the page.

The 'Jovial' paper matches well with the 'Jovial' strip of fabric on the page's edge.
The stickers are from the 'Jovial' Elements sheet too. Then, its a matter of adding a number!
For the reverse side of the transparency, I'm pretty sure I'll match up
another photo on the other side, use some more stars, the tag and number
shape so that there arent any odd bits sticking out looking unfinished
when viewing through it either side

Just lifted this up to get a 'see-through' look and the reflection has arrived! UGH!
But you get what I mean! LOL

Whoohoo! Day One done!
(does look better with the black under it :) )

--------------------------------------------------------------
DAY 2
is the reverse side of the transparency from Day 1,
so need to fill those white spaces

Instead of one photo, there are two smaller photos here
I
also wanted to do a flip photo over the top because there were a couple
more photos to include and only one concentrated place to put them.
These flip stick-on inserts are fabulous - but the size I needed was a
lot smaller than this 6x4"size I had.
Out came the fuse tool - and ... no time at all, zipped around where it was needed.
The great thing about these flip pockets is that you can also add another photo on the flip side as well. Got to love that!

All in place with the white patches all covered
(sorry about the reflections - the bain of my life!!)

The reverse side of the flip
The almost the end of a busy week

Lifting up the transparency page so you can see the 'see-through' bits
(s'cuse my scrap room bits sneaking into the background!)
I
was going to put some more stars onto this side as well and let them
sit over the photo, but when adding the flip pocket - weeeell, that was
not practical!
Luckily the Basic Grey Jovial paper had great reverse sides!

I love the 'see-through' page revealing what may lie underneath!

----------------------------------------------------
DAY 3
DAY 3
This page was pretty straight forward on black Basic Grey paper.
a line of photos to represent the day. I love to draw squiggly lines to journal on too!

Ugh and did you notice?
I just couldnt revert to black and white photos like my plan was!!!
I soooo wanted to do that!
I've tried but it felt like I was taking all the colour out of Christmas!
That idea has been well and truly flicked to the side!
I just couldnt revert to black and white photos like my plan was!!!
I soooo wanted to do that!
I've tried but it felt like I was taking all the colour out of Christmas!
That idea has been well and truly flicked to the side!
------------------------------------------------------
Day 4
(very sorry for the bad photography, we really bad weather here at the moment
so the lighting is not great)
Lizzy reminded me that I need to journal more, and her strip journaling is fabulous!
There is a site called 'Acme Labelmaker' that really is great for this!
(believe me, it looks so much better in real life!)

So type in your words, it shows up in whatever type and colour you would like,
Then copy and paste it to a document, print it out and cut it up....

Works a treat!

And these were the little overlays (with the lovely quotes on them) cut from a
12x12 transparency to cover the photos

--------------------------------------------------------------
DAY 5
,
I've added pom pom trim...
I love it and try to add it into each of my december dailys!

Just stick it along the edge of the page so it overhangs

Now to pick some colours that pop on that black.
These are all Basic Grey Jovial papers. I really love the spot one (Coal) as it
looks like baubles once the tree diecuts have been made

Add a little dimensional magic helps too!

The colour is popping!

----------------------------------------------------
DAY 6
You can see the reverse side of the pompom trim now.

The little star is actually the left over bit (the negative) of the diecut stars from the first
page. So I've cut out along the shape to make this star and hung a little charm from it
to pretty it up a bit

--------------------------------------------------
DAY 6
A fairly straight forward page using project life cards as bases
And love to use an oversized number from time to time too!

Use a craft knife to cut down a side of picture on a project life card and poke
the photo in behind.

------------------------------------------------------------
Here's how the pompom trim looks so far with the album closed..
loving it!!

And with it standing up...
So am going to put more in!!!

----------------------------------------------------
DAY 8
Every now and then my three daughters put up, like, or comment on
something funny on facebook (like most people do), the banter and
ribbing they give each other (and at times aimed at me) brings a good
laugh. So for this page there is no photo, just screen shots of their
facebook comments etc, which make for a great page in the december
daily. I'm sure one day they will laugh at how 'old-fashioned' facebook
was!!!
And remember I said that this album was sort of a tribute to Basic Grey...I've used some lovely oldies..
The dot is 'Jovial - Coal' and the red paper is 'Infuse - Stew' (a fave red of mine!)
And remember I said that this album was sort of a tribute to Basic Grey...I've used some lovely oldies..
The dot is 'Jovial - Coal' and the red paper is 'Infuse - Stew' (a fave red of mine!)

The ivy leaves and berries are Basic Grey 'Wassail' stickers
(such a lovely blast from the past)

and these basic grey 'Figgy Pudding' bauble stickers
(great to put the number of your day on)

---------------------------------------------------------
DAY 9
Each year I love to send a 'JibJab' e-card (which is kind of a movie card) to friends and family,
This year's card saw us dressed in matching festive sweaters and skinny little legs
decorating and celebrating the inside of our 'house'.
To try to capture this for my December Daily... I kept hitting the pause button and snapping a shot,
so got all of these cute little 'moments'
Because there are lots of these moments - little pockets work well.
The song put to the the video clip was 'Its Beginning to look a lot like Christmas'
So looking up the lyrics on the net... wrote the words out under and in between the pics

Measuring out the photos (because I did a back and front photo(to be
used on the other side of the page where the underside of the sewing
would show through and showing, these pic took 2 pages) sewed little
pockets. The paper for these pages are basic grey 'Figgy Pudding'
Balsam and I sew two sides together to make sure the pages stay strong.
The fabric edging is also basic grey quilting from the 'grunge' range.

Now with the little photo poked behind

Sooooo, on the next page....

The sewing that came through on the other side was a more 'decorative' look
With the photos cut just short of touching the stitching

The photos arent great quality, but it doesnt matter - it brought quite a source of laughter
last year, so hopefully this years jibjab pages will too.
--------------------------------------------------------
The colour is definitely popping!
This time... some smaller yellow pompom to help :)

Love the colour in this Basic Grey Jovial Lace Doily
I used the other half of it in the very first page of this album (all used up now boohoo)

Stuck down against the black Basic Grey background paper
and the eyelets set in. These eyelets are much larger than the Crop-A-Dile ones
as its needs easier movement with the wooden covers. These were purchased at a
hardware store with a the pincher thingys.. whatever they are called!

It kinda gives another dimension when a photo is pushed behind the edge of fancy paper
with other photos one the top side


---------------------------------------------------------
DAY 11
It's always fun to try capture the antics of pets...
This page will probably bring some giggles to my three girls knowing the
personality of one little rascal!

And how fun that Basic Grey Jovial had a little bird sticker on its Sticker page.
All I had to do was to put a bit of bling string in its mouth to represent Chirp flying off
with Maggie's treat.

And you can find different ways of putting the date on each page too,
it worked well on a 3D present sticker

-----------------------------------------------------------------
DAY 12
Red white and black can be striking colours together so tried to stick mainly to the three.
The little diecut window even got a few smudges of black and red ink because
it was a little 'stark' as it was. It toned it down a bit.

Arent the little cardinals cute and added to all the horizontal lines going on
on the page.

----------------------------------------------------------
DAYS 14 & 15
The reason I've put these two days together is because as a transparency page,
everything need to be measured back and front so it works...

and the reverse side....
The tree is actually cut from a Fancy Pants 12x12 transparency page.
I couldnt see myself using the whole big page, so cutting out the tree works well!
The tree is actually cut from a Fancy Pants 12x12 transparency page.
I couldnt see myself using the whole big page, so cutting out the tree works well!

I've stitched the ricrac on both sides of the transparency for a nicer edging.
Just stuck it down with glue first so it held its place to sew the both sides at the one time.
Just stuck it down with glue first so it held its place to sew the both sides at the one time.

And here's a peep how the transparency page looks now in the album
because while the page looks quite plain sitting out by itself, once it
has its place, the page before and the page that comes after increases
its interest and busy-ness.. and can change its colour :)
Day 14 actually sits over a grey page, so looks much lighter in colour ,
and you can see the red fabric strip edging of the next page


Day 15 sits over a black page and looks competely different

------------------------------------------------------------------
DAY 16
It's a pretty straight foward page..
Because Hannah works in a Library, I've still tried to make it relative and festive by
using stars with book print on them

------------------------------------------------------
Day 17
It's summer here and it snowed!
I had this fabulous WRMKs silver confetti transparency 12x12 which cut
smaller, fit over the photo perfectly for a 'snowy' affect. It was
great to use some of the Christmas 'snow' themed stickers that turn up
amongst Christmas themed goodies that I thought I'd never use for here
in Australia! LOL
You can see the yellow and green pompoms sticking out from the previous pages too.


--------------------------------------------------------------
DAY 18
Managed to get another event off facebook!
I'm starting to find that this is a great source for a December Daily
page especially for photos and commentary with daughters!
Because there was already quite a bit of print on the page, I've taken
to journaling with a white pen around the border which worked better
than another journaling block.

These little birds were the left over result of me printing and cutting
out for the two birds on the front cover of this album. I was left with
a long piece of Basic Grey's 'Jovial' paper with great Christmas
script on it - perfect for this bird page! You just never know what
subject might turn up and suddenly scrappy things become relevant! lol!

--------------------------------------------------------
Day 19
A try at getting a 'portrait'

These are 'Jovial' 3d sticker ornaments which look great with a piece of coloured twine
leading up to some diecut pine branches hanging overhead to paint a scene

------------------------------------------------------
Day 20
It's great to do fun pages too.
My massage therapist is also a great friend
so when she handed me this 'photo' card... I took a pic of it and set it into this page...
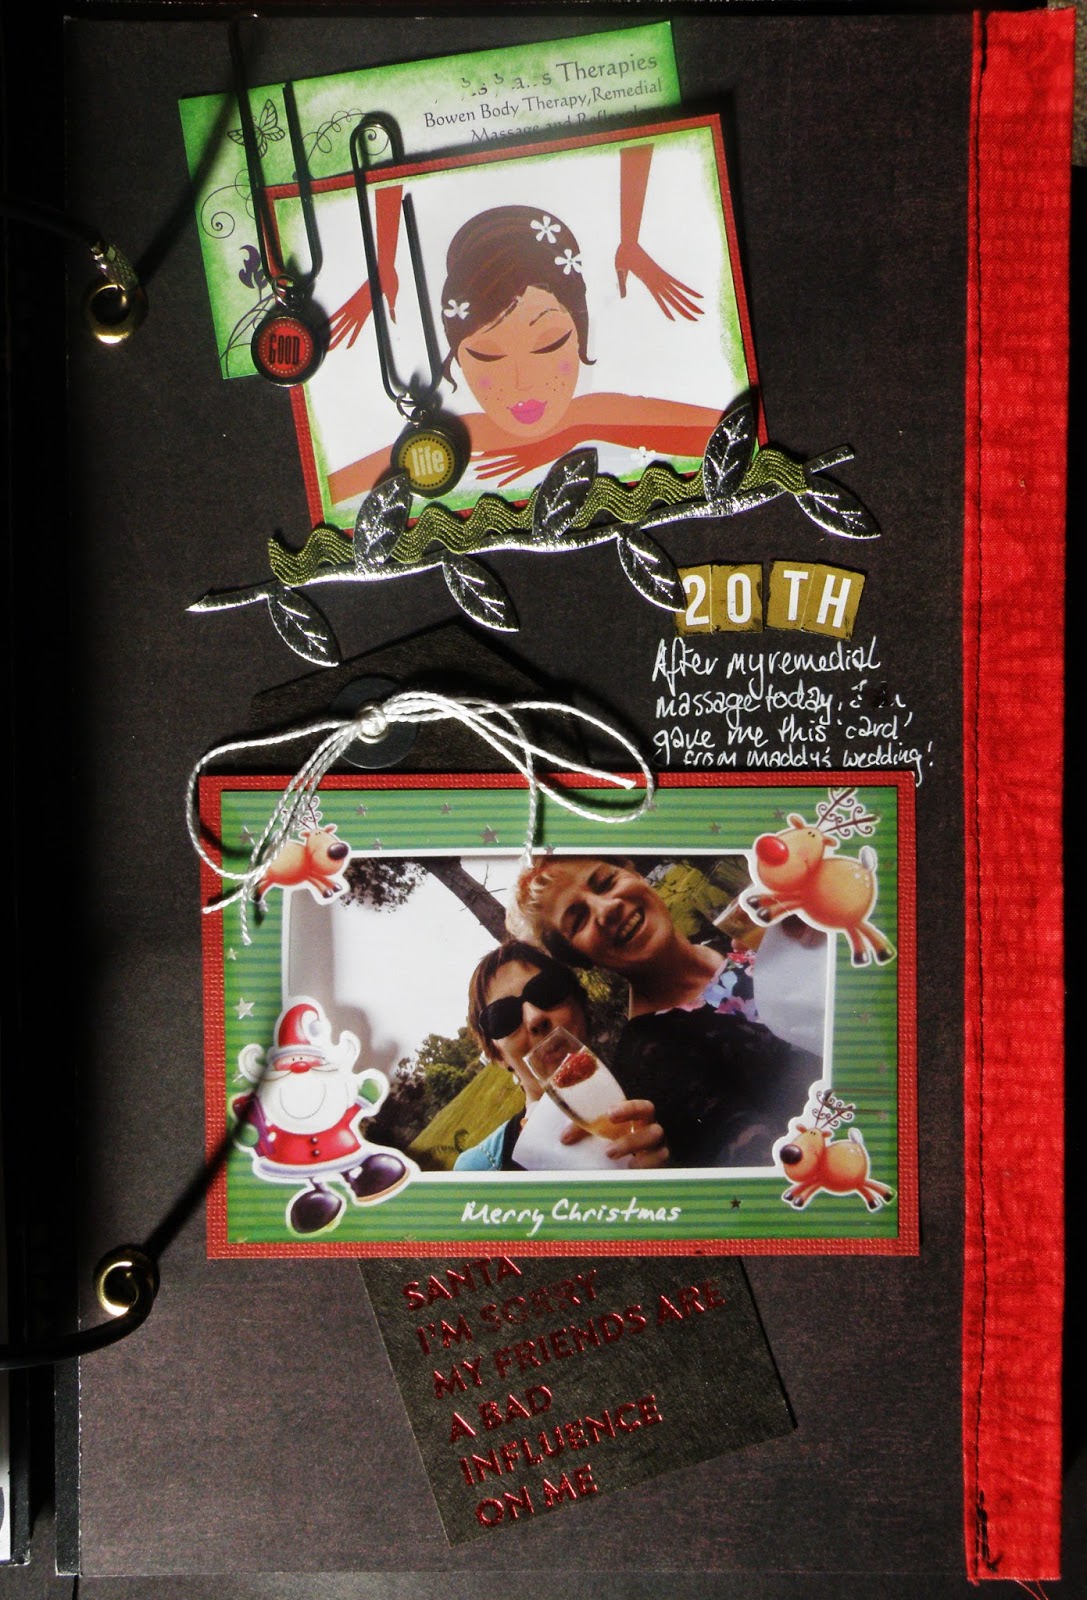
Add in business cards if they are relevant and if its not possible for a
photo (like my remedial massage - heck no!) then clip art can be really
handy!

Such a great tag!!!
And did raise some giggles!

-------------------------------------------------------------
Here are the two little birds on the front cover....
oooh this album is starting to get full!
I still want to use a bigger red pompom trim on the edge of one of the pages yet!!

-----------------------------------------
Day 21
I always try to put in a page about my two birds. Getting them to 'pose' next to
decorations and stay there long enough is often problematic

This time a washi tape base is used. I LOVE a very wide washi tape
And just tear off the ends

Then two thinner festive washi tape strips down the middle of that

The 'swag' is actually a round wreath diecut that was broken apart
then pleated a little to make it lie open and some sparkle dots added.


------------------------------------------------------
DAY 22
More pompom trim!! This one is larger than the other two I've used
(You could also glue it if you dont want to sew)


I've added the vet bill to give an indication of what medicenes and the cost
was 'back in 2016' for in years to come
(LOL - that sounds ludicrous! but I already gasp at my really old Dec Dailys!!!)

The little red glitter swag acts as a something the pics are hung from by drawing little bows and running a line to the photos

---------------------------------------------------------------
DAY 23
The other side of the red pompom page!
These are basic grey's 25th & Pine project life cards which fit
really well on this page. I cut a few of them up and put them together
so they worked well, and placed the photos over things that really were
not that important. A few stickers.....

And a gorgeous lamp diecut with some inking.
I tried to fit the cards in so the sewing from the other side could be seen too.

----------------------------------------------------------------
DAY 24
Oooh another transparency!!!
With some fabulous trim sewn up the side :)

And some added vintage doilies to hold the photos..

Just cut off the edges of the doilies...

And voila! We'll be able to put photos back and front without having
to match up exactly :)

------------------------------------------------------
DAY 25
The is the reverse side of Day 24

The white Christmas trees on the transparency arent covered up as much on this side,
the trim and doilies are still visable and the matching shaped date tag
which worked well this side too
which worked well this side too


Christmas takes up a couple of pages...
*Note for next year..... make sure I'm in photos!*
(you can see where I've been)
It's not until I scrap my pages that I realise, I'm probably not in many if any of them!
(you can see where I've been)
It's not until I scrap my pages that I realise, I'm probably not in many if any of them!

The trim (which was just from the $1shop) folded in half and sewn along the edge.

The little line of Christmas trees are coloured here and there with a
white 'jelly roll' pen. I've found this to be the best in white
colouring and journaling there is and I've tried dozens and dozens of
brands! Beware though... make sure the pen has 'O8' on the side of it.
It could be branded 'icecream', but dont accidently buy the 'glaze or
souffle' - they are clear or only just white. I use the '08' jelly
roll pen for my art work on other projects too.... LOVE it!

Glad to use up very very old rubons!! And held my breath it would all
stick smoothly (we all know how badly old rubons can go!)

-------------------------------------------
DAY 26
Green on this side... (all the pages consist of two papers together for extra strength)
Another older basic grey paper :)

A tiny star stamp (on the end of my finger!) was used to stamp all over the photos and paper
finishing off with some bling!

------------------------------------------------
On the back cover....for the 26th
The front page of our local newspaper had a fabulous photo so used that to finish off
as we fall into a state of 'holiday-ness' lol!

The background is just a few different Project Life cards cut up, switched around or shortened

All finished off with some Basic Grey Jovial stickers.

In the meantime, we'd love you to share all your process and December Dailys with us
HERE
We'd love to see them!
----------------------------------------------------------------------
Wow wow wowwwwwwwwwwwwwww! This is AMAZING!!!!!!!!!!!!!!!!!!!!
ReplyDeleteOh so different and totally fantastic. Looooove the way the black really shows off the pops of other colours. Fabulous Mandy.
ReplyDeleteThis truly looks amazing, Mandy. LOVE, LOVE, LOVE IT!
ReplyDeleteThats an awesome cover. :)
ReplyDeleteLooks INCREDIBLE.... I guess you'd like to hit me if I said I just tossed out a bag of balsa wood? So I won't say!!!! Love the brights against the black:)
ReplyDeleteFabulous creating, very original and it looks great!
ReplyDeleteThis looks wonderful!! Love the pops of colour on the black ..fabulous!!
ReplyDelete